Are you wondering how to add funds to your Trust Wallet? Look no further, as this step-by-step guide will walk you through the process of depositing money into your Trust Wallet. Trust Wallet is a popular mobile wallet that allows users to securely store and manage their cryptocurrencies.
To begin, make sure you have the Trust Wallet app installed on your device. If not, you can easily download it from the App Store or Google Play Store. Once you have the app installed, open it and follow these steps to add money to your wallet:
- Step 1: Open the Trust Wallet app on your mobile device.
- Step 2: Tap on the “Wallet” tab at the bottom of the screen.
- Step 3: Select the cryptocurrency you want to deposit into your wallet. Trust Wallet supports a wide range of cryptocurrencies.
- Step 4: Tap on the “Receive” or “Deposit” button, depending on the wallet interface.
- Step 5: You will be provided with a wallet address. This is a unique identifier that you will use to receive funds.
- Step 6: Copy the wallet address or use the provided QR code to receive funds. You can share this address with others who want to send money to your wallet.
- Step 7: Once the funds are sent to your wallet address, they will appear in your Trust Wallet.
That’s it! You have successfully added money to your Trust Wallet. Now you can use these funds for various purposes, such as buying, selling, or trading cryptocurrencies. Trust Wallet provides a secure and user-friendly interface for managing your funds, making it a popular choice among crypto enthusiasts.
Remember to double-check the wallet address before sending any funds. Sending funds to the wrong address may result in permanent loss of your money.
Adding money to your Trust Wallet is a simple and straightforward process. Follow this step-by-step guide to deposit funds into your wallet and start exploring the world of cryptocurrencies with ease and convenience.
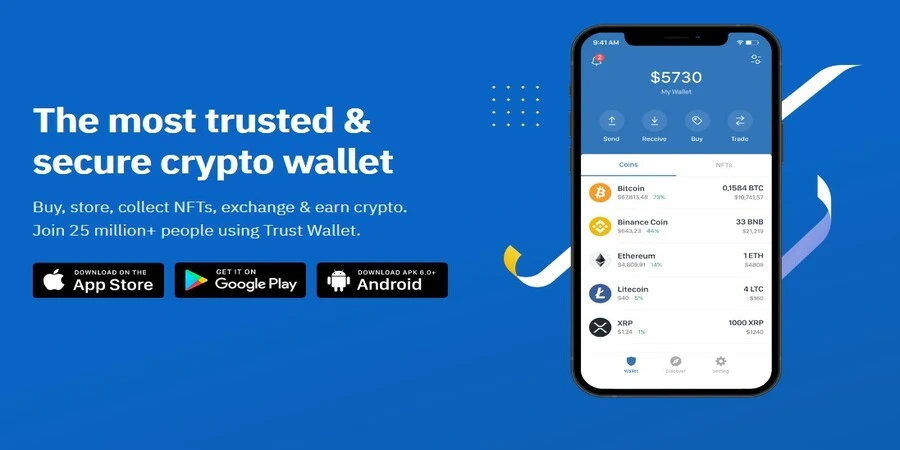
Install Trust Wallet App on Your Device
If you want to add funds to your Trust Wallet, you first need to install the Trust Wallet app on your device. The Trust Wallet is a mobile cryptocurrency wallet that allows you to securely store, send, and receive digital assets.
Step-by-Step Guide:
- Go to your device’s app store (Google Play Store for Android or Apple App Store for iOS).
- Search for “Trust Wallet” in the app store search bar.
- Tap on the Trust Wallet app when it appears in the search results.
- Tap the “Install” or “Download” button to download and install the app on your device.
- Once the installation is complete, tap on the Trust Wallet app to open it.
- Follow the on-screen prompts to set up your Trust Wallet. This may include creating a new wallet or importing an existing wallet using a recovery phrase.
Now that you have successfully installed the Trust Wallet app on your device and set it up, you can proceed to the next step of adding money into your wallet.
Create a Trust Wallet Account
Before you can start adding funds to your Trust wallet, you need to create an account. Follow this step-by-step guide to create your Trust Wallet account:
- Download the Trust Wallet app from the App Store or Google Play Store.
- Once the app is installed, open it and tap on “Create a New Wallet”.
- Read and agree to the Terms of Service.
- Write down and safely store the 12-word recovery phrase that is provided. This is necessary to restore your wallet if you ever lose your device or forget your password.
- Create a strong password for your wallet.
- Your wallet is now created! You can now access it by using your password or the recovery phrase.
By creating a Trust Wallet account, you will have a secure place to store your funds and easily manage them.
Set Up Security Measures for Your Trust Wallet

Once you have successfully deposited funds into your Trust Wallet, it is important to set up security measures to protect your assets. Follow the step-by-step guide below to ensure the safety of your wallet:
1. Enable Two-Factor Authentication (2FA)
Enabling 2FA adds an extra layer of security to your Trust Wallet. It requires you to enter a unique verification code, usually generated by an authenticator app, every time you log in or perform certain actions. To enable 2FA:
- Open your Trust Wallet app and navigate to the settings menu.
- Select “Security” and then “Two-Factor Authentication.”
- Follow the on-screen instructions to set up and activate 2FA.
2. Create a Strong Wallet Password
Choose a strong and unique password for your Trust Wallet to prevent unauthorized access. Use a combination of letters, numbers, and special characters. Avoid using common passwords and personal information that can be easily guessed. Remember to regularly update your password for added security.
3. Enable Biometric Authentication
If your device supports biometric authentication, such as fingerprint or face recognition, enable it for your Trust Wallet. This will provide an additional layer of security and make it more difficult for unauthorized individuals to access your wallet.
4. Backup Your Wallet
Make a backup of your Trust Wallet. This ensures that you can recover your funds in case your device gets lost, stolen, or damaged. Follow these steps to back up your wallet:
- Open your Trust Wallet app and navigate to the settings menu.
- Select “Security” and then “Backup Wallet.”
- Follow the on-screen instructions to create a backup phrase.
- Write down the backup phrase and keep it in a secure place, away from prying eyes.
5. Keep Your Trust Wallet App Updated
Regularly check for updates for your Trust Wallet app. Developers frequently release security patches and updates to fix vulnerabilities and improve the overall security of the wallet. Keeping your app updated helps prevent potential security breaches.
By following these security measures, you can enhance the protection and security of your Trust Wallet. Remember to stay vigilant and be cautious when interacting with unknown or suspicious websites, emails, or applications to avoid phishing attempts or scams.
Choose a Supported Cryptocurrency
In order to add funds to your Trust Wallet, you need to choose a supported cryptocurrency to deposit into your wallet. Trust Wallet supports a wide range of cryptocurrencies, including popular ones like Bitcoin (BTC), Ethereum (ETH), Binance Coin (BNB), and many others.
To top up your Trust Wallet with money, follow this step-by-step guide:
- Open the Trust Wallet app on your device and log in to your wallet.
- Click on the “Add” button or navigate to the “Top Up” section in the app.
- Choose the cryptocurrency you want to add funds to your wallet. Make sure it is supported by Trust Wallet.
- Copy your wallet address or scan the QR code provided.
- Open the cryptocurrency wallet or exchange where you currently hold the funds you want to deposit.
- Initiate a transaction to send the desired amount of funds to your Trust Wallet address.
- Double-check the transaction details, including the recipient address, to ensure accuracy.
- Confirm the transaction and wait for the funds to be transferred to your Trust Wallet. This process may take some time depending on network congestion and transaction fees.
- Once the funds are successfully deposited into your Trust Wallet, you can use them for various purposes such as trading, staking, or simply holding them.
By following this step-by-step guide, you can easily add funds to your Trust Wallet by depositing supported cryptocurrencies into your wallet. Keep in mind that the process may vary slightly depending on the cryptocurrency you choose and the wallet or exchange you use to send the funds.
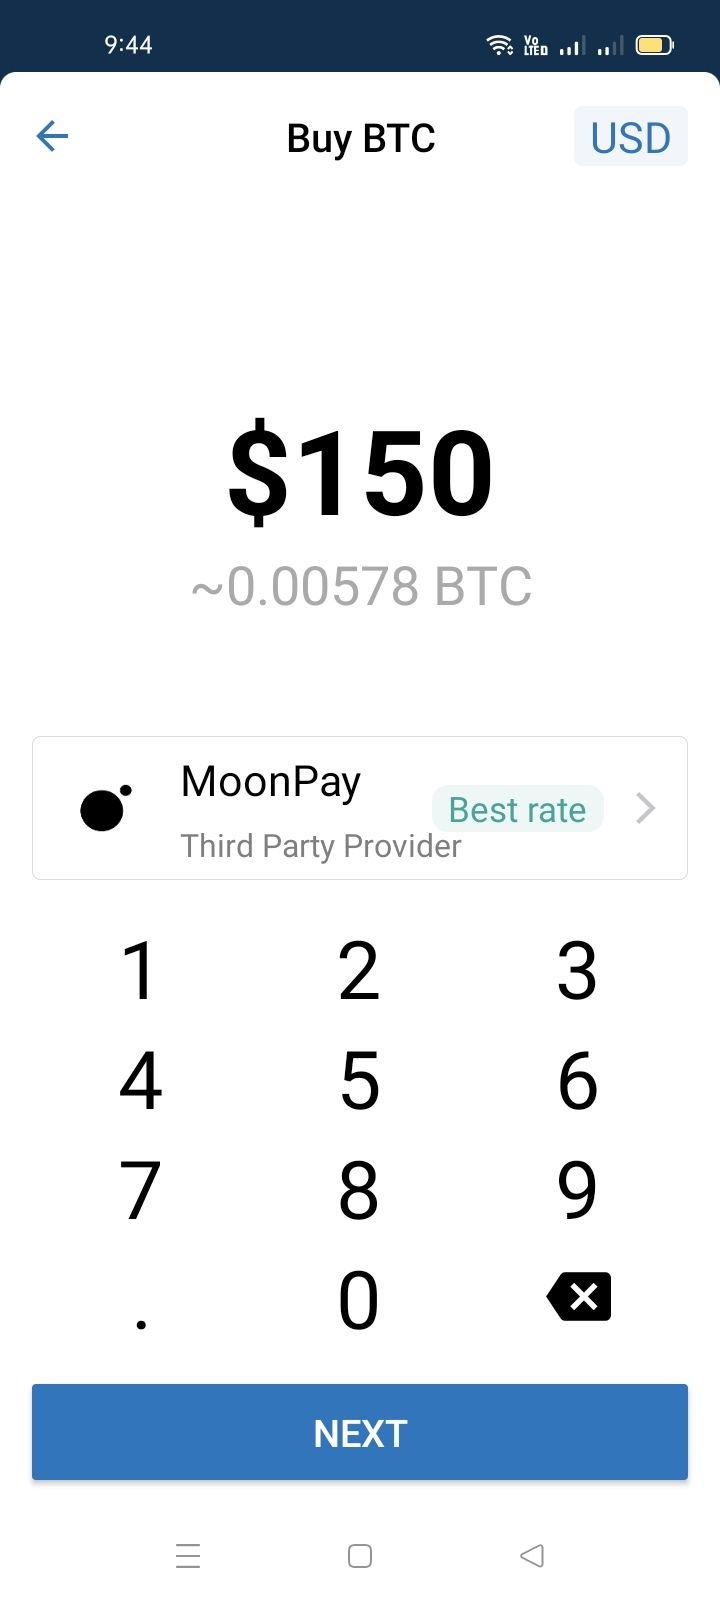
Buy Cryptocurrency with Fiat Currency
To add money to your Trust Wallet, you can buy cryptocurrency with fiat currency. Fiat currency refers to traditional government-issued currencies like the US Dollar, Euro, or Japanese Yen.
Here is a step-by-step guide on how to buy cryptocurrency with fiat currency and add it to your Trust Wallet:
- Choose a trusted cryptocurrency exchange. There are several reputable exchanges where you can buy cryptocurrency with fiat currency. Some popular options include Coinbase, Binance, Kraken, and Gemini. Research these exchanges to determine which one suits your needs best.
- Create an account on the exchange. Sign up for an account on the exchange of your choice. This typically involves providing your email address, creating a password, and completing any verification processes required by the exchange.
- Complete the verification process. Many exchanges require users to complete a verification process before they can deposit or withdraw fiat currency. This process may include providing identification documents such as a driver’s license or passport.
- Link your bank account or credit/debit card. To purchase cryptocurrency with fiat currency, you’ll need to link your bank account or credit/debit card to the exchange. This will allow you to transfer funds from your bank account or make purchases with your card.
- Choose the cryptocurrency you want to buy. Select the cryptocurrency you want to purchase from the available options on the exchange. Bitcoin (BTC) and Ethereum (ETH) are two popular choices, but there are many others to choose from.
- Place your order. Enter the amount of fiat currency you want to spend on cryptocurrency and submit your order. The exchange will execute the purchase at the current market price.
- Transfer the purchased cryptocurrency to your Trust Wallet. Once your purchase is complete, navigate to the “Withdraw” or “Send” section of the exchange and enter your Trust Wallet address. This will transfer the purchased cryptocurrency from the exchange to your wallet.
Once the transfer is complete, you will have successfully bought cryptocurrency with fiat currency and added it to your Trust Wallet. You can now use these funds to participate in the crypto market, make online purchases, or hold them as an investment.
Transfer Cryptocurrency to Your Trust Wallet
If you want to add funds to your Trust Wallet, you can easily transfer cryptocurrency from another wallet or exchange. Here is a step-by-step guide on how to transfer your funds into your Trust Wallet.
Step 1: Top Up Your Trust Wallet
To add funds to your Trust Wallet, you need to top up your wallet with the desired cryptocurrency. Make sure you have the necessary amount of the cryptocurrency in another wallet or exchange that you want to transfer to your Trust Wallet.
Step 2: Find Your Trust Wallet Address
In order to transfer cryptocurrency into your Trust Wallet, you will need to know your Trust Wallet address. Open your Trust Wallet app and navigate to the corresponding cryptocurrency wallet you want to receive the funds in. Locate the “Receive” or “Deposit” button and click on it to reveal your wallet address.
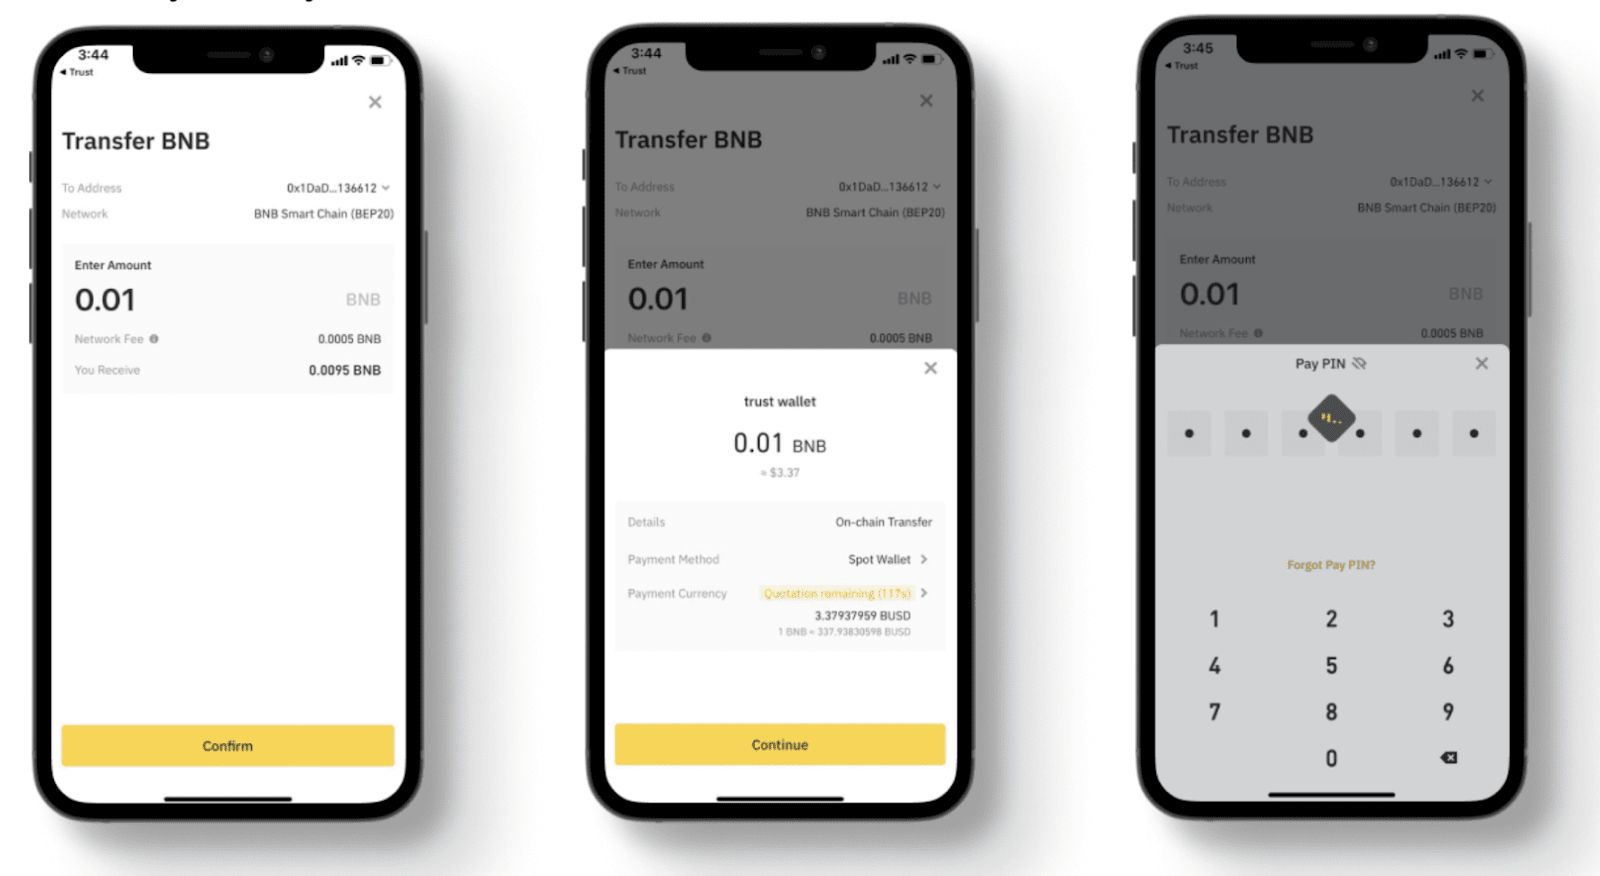
Step 3: Transfer Funds into Your Trust Wallet
Now that you have your Trust Wallet address, you can proceed to transfer the funds from your other wallet or exchange. Open the wallet or exchange from which you want to send the funds and navigate to the “Send” or “Withdraw” section. Enter your Trust Wallet address as the recipient address and specify the amount of cryptocurrency you want to transfer. Confirm the transaction and wait for the transfer to be executed.
Step 4: Verify the Funds in Your Trust Wallet
After completing the transfer, it may take some time for the funds to appear in your Trust Wallet. You can check the status of your transaction by using a blockchain explorer or by checking your Trust Wallet transaction history. Once the transfer is confirmed on the blockchain, you will see the funds in your Trust Wallet.
Congratulations! You have successfully transferred cryptocurrency into your Trust Wallet. Now you can use your funds for various purposes, such as trading, investing, or making payments with supported merchants.
Find Your Trust Wallet Address

To top up your Trust Wallet with funds, you will need to know your Trust Wallet address. Here is a step-by-step guide on how to find it:
- Open the Trust Wallet app on your device.
- Tap on the “Wallet” tab at the bottom of the screen.
- Choose the wallet you want to add funds to, or create a new wallet if you don’t have one yet.
- Once you have selected the wallet, tap on the “Receive” button.
- Your Trust Wallet address will be displayed on the screen. It usually starts with “0x” followed by a series of alphanumeric characters.
- You can copy your Trust Wallet address by tapping on the “Copy” button next to it.
Now that you have your Trust Wallet address, you can proceed with adding money into your wallet by following the step-by-step guide on how to deposit funds.
Send Cryptocurrency to Your Trust Wallet
If you want to add funds to your Trust Wallet, you can do so by following these step-by-step instructions:
- Open your Trust Wallet app on your mobile device.
- Tap on the “Deposit” or “Add Funds” button, typically located at the bottom of the screen.
- Choose the cryptocurrency you want to deposit into your Trust Wallet.
- Copy the wallet address provided.
- Open your external cryptocurrency wallet or exchange account.
- Initiate a transaction to send the desired amount of cryptocurrency to your Trust Wallet.
- Paste the Trust Wallet address as the recipient of the transaction.
- Double-check that the wallet address is correct.
- Confirm and authorize the transaction.
- Wait for the transaction to be confirmed on the blockchain network.
- Once the transaction is confirmed, the funds will be added to your Trust Wallet.
Remember to double-check the wallet addresses to ensure that you are sending the funds to the correct wallet.
This step-by-step guide provides the necessary instructions to successfully add funds to your Trust Wallet by depositing cryptocurrency from an external wallet or exchange account.
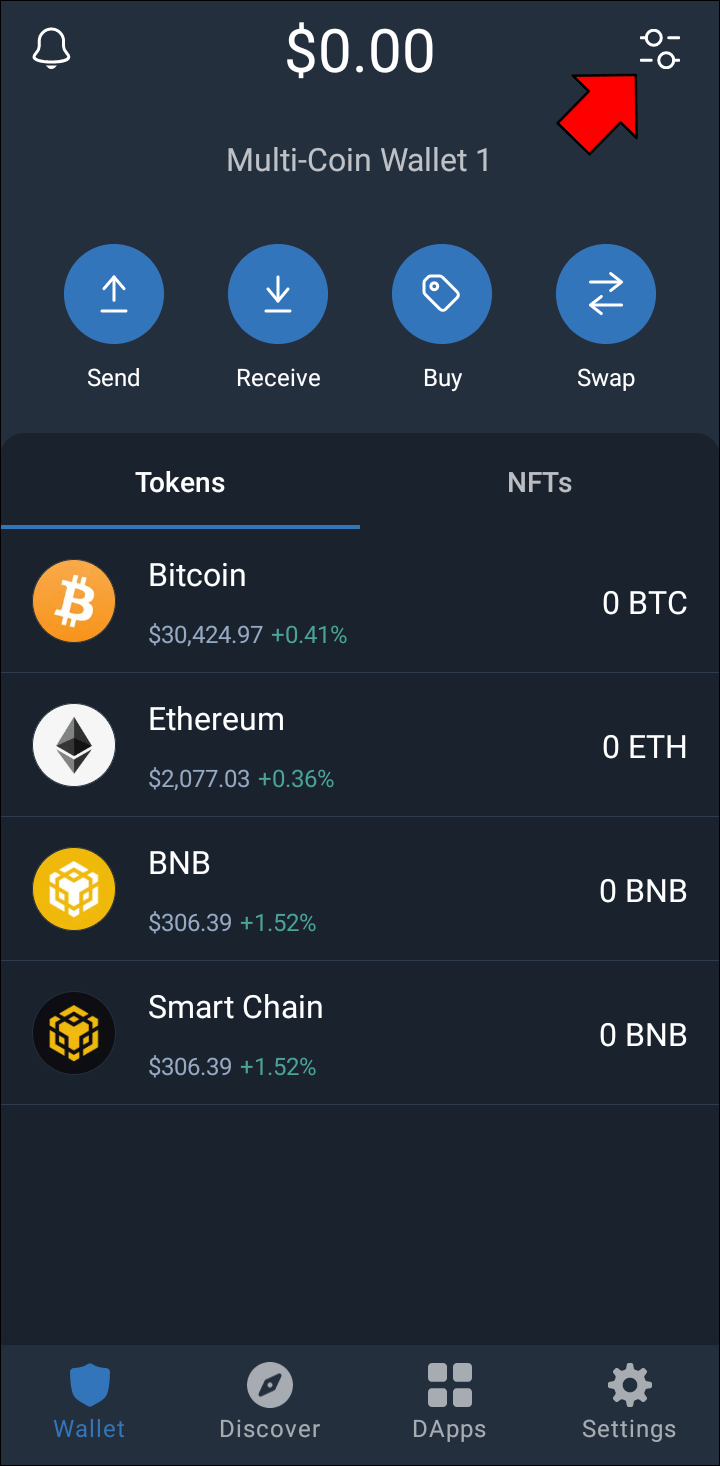
Check Your Trust Wallet Balance
Before you can start adding money to your Trust Wallet, it’s essential to check your current balance to ensure you have sufficient funds available. Here is a step-by-step guide on how to check your Trust Wallet balance:
- Open your Trust Wallet app on your device.
- Once the app is open, you will be directed to the wallet’s main interface.
- Look for the “Balance” section, which is usually displayed prominently at the top of the screen.
- In the “Balance” section, you will see the amount of funds currently in your wallet.
- If you don’t see any funds displayed or your balance is lower than expected, you may need to deposit or top up your wallet.
If you have funds in your Trust Wallet and would like to check the details of your balance, you can click on your wallet’s balance section.
That’s it! Now you know how to check the funds in your Trust Wallet. If you’re ready to add more money to your wallet, you can follow our step-by-step guide on how to add money to Trust Wallet.
Start Using Your Added Funds in Trust Wallet

After successfully adding funds to your Trust Wallet, you can now start utilizing the deposited money for various transactions and activities within the wallet. Here is a step-by-step guide on how to use your funds:
Step 1: Open Trust Wallet
- Launch the Trust Wallet application on your mobile device.
- If prompted, enter your passcode or use biometric authentication to access your wallet.
Step 2: Navigate to your Wallet
- In the Trust Wallet main screen, tap on the “Wallets” tab at the bottom.
- Scroll through the list of wallets and select the wallet that you added the funds to.
Step 3: Check your Balance
- Once you are inside your wallet, you will see the balance displayed at the top.
- This balance represents the amount of money you have in your wallet, including the funds you added.
Step 4: Make Transactions
With funds in your Trust Wallet, you can now proceed to make transactions, such as:
- Sending money to another wallet address
- Buying and selling cryptocurrencies
- Participating in decentralized finance (DeFi) protocols
- Investing in initial coin offerings (ICOs)
Step 5: Explore Trust Wallet Features
In addition to the basic transactions mentioned above, Trust Wallet offers a wide range of features and services that you can explore:
- Staking and earning rewards
- Access to decentralized exchanges (DEX)
- Integration with third-party dApps
- Managing multiple wallets and assets
By following these steps, you can effectively use the funds you added to your Trust Wallet for various purposes and take advantage of the features offered by the wallet.
Frequently asked questions:
What is the first step to top up Trust Wallet?
To top up Trust Wallet, you should start by opening the Trust Wallet app on your device.
Videos:
How to Setup and use Trust Wallet – Complete Tutorial For Beginners
Great article! I followed the steps and successfully added funds to my Trust Wallet. It was really easy and convenient. Thank you for the clear instructions!
Great guide! I followed the steps and added funds to my Trust Wallet without any issues. Trust Wallet is a reliable and user-friendly app for managing cryptocurrencies. Highly recommended!
Thanks for the helpful guide! I just followed the steps and successfully added money to my Trust Wallet. It’s so easy to use!
This guide was really helpful! I followed the steps and was able to add money to my Trust Wallet without any issues. Trust Wallet is a great app for securely storing and managing cryptocurrencies. Thank you for providing such clear instructions!
Thanks for the step-by-step guide! It was really helpful and easy to follow. I had no issues adding funds to my Trust Wallet using these instructions. Now I can easily manage and store my cryptocurrencies. Highly recommend this wallet!
Thank you for this guide! I managed to add money to my Trust Wallet without any issues. The steps were clear and easy to follow. Keep up the good work!
This article was very helpful! I followed the step-by-step guide and was able to easily add funds to my Trust Wallet. Thank you for sharing!
Great guide! I followed these steps and was able to easily deposit money into my Trust Wallet. Trust Wallet is a reliable app for securely storing and managing my cryptocurrencies. Highly recommend!
Great article! Adding funds to Trust Wallet was a breeze thanks to this step-by-step guide. Trust Wallet is truly a reliable option for securely storing and managing cryptocurrencies.
How long does it usually take for the funds to appear in the Trust Wallet after they are sent?
Hi JohnSmith123! The time it takes for funds to appear in your Trust Wallet can vary depending on the cryptocurrency network congestion and the transaction fee you set. Generally, transactions can take anywhere from a few seconds to a few minutes to be confirmed and appear in your wallet. However, in some cases, it may take longer if there is high network traffic. It’s always a good idea to double-check the transaction status on the blockchain explorer using the transaction ID provided. Hope this helps!
This guide was very helpful! I followed the steps and successfully added money to my Trust Wallet. Now I can easily access my cryptocurrencies. Thank you!
This guide is so helpful! I followed the steps and was able to easily add funds to my Trust Wallet. Now I feel more confident managing my cryptocurrencies. Thank you!
Thanks for the detailed guide! I followed the steps and successfully added funds to my Trust Wallet. It’s so convenient to have all my cryptocurrencies in one place.
Is it safe to share my wallet address with others?
Yes, it is safe to share your wallet address with others. Your wallet address is like your bank account number, and it can be safely shared to receive funds. However, it is important to be cautious and only share your wallet address with trusted individuals or reputable sources. Avoid sharing it in public forums or with unknown parties to ensure the security of your funds. Remember to always exercise caution when dealing with cryptocurrencies.
Great article! I followed these steps and easily added funds to my Trust Wallet. It’s a convenient way to store and manage my cryptocurrencies.
Thanks for the detailed guide! I followed the steps and was able to easily add funds to my Trust Wallet. It’s a great way to securely manage my cryptocurrencies.
Thanks for the guide! I followed the steps and was able to easily add funds to my Trust Wallet. It’s great to have a secure and convenient way to store my cryptocurrencies.
Thanks for the detailed guide! I followed these steps and managed to add funds to my Trust Wallet without any issues. It’s great to have a secure and user-friendly platform like Trust Wallet to manage my cryptocurrencies.
Great guide! I followed these steps and had no issues adding money to my Trust Wallet. It’s so convenient to have all my cryptocurrencies in one place. Highly recommend Trust Wallet!
This is a really helpful guide. I followed the steps and was able to add funds to my Trust Wallet without any issues. Trust Wallet is a great mobile wallet for securely managing cryptocurrencies.
Great article! I followed the step-by-step guide and was able to add funds to my Trust Wallet without any issues. Trust Wallet is a secure and user-friendly mobile wallet. Highly recommend!
Great article! I followed the steps and easily added money to my Trust Wallet. Now I can manage my cryptocurrencies conveniently.
How long does it usually take for the funds to appear in the Trust Wallet after they have been sent?
It typically takes a few minutes for the funds to appear in your Trust Wallet after they have been sent. However, the time may vary depending on the network congestion and the speed of the cryptocurrency you are using. Rest assured, your funds will be securely deposited into your wallet once the transaction is confirmed.
Could you please provide more information on the security measures in place to protect the funds stored in Trust Wallet? I want to ensure that my cryptocurrencies are safe.
Hi DavidSmith21! Trust Wallet takes the security of your funds very seriously. They use industry-leading security measures to protect your cryptocurrencies. Trust Wallet is a decentralized wallet, which means that you have full control over your private keys and funds. The wallet also supports biometric authentication, such as fingerprint and face recognition, to add an extra layer of security. Additionally, Trust Wallet uses advanced encryption techniques to keep your data safe. Rest assured that your cryptocurrencies are in good hands with Trust Wallet!
Thanks for the detailed guide! I followed the steps and managed to add funds to my Trust Wallet without any issues. It’s really convenient to have all my cryptocurrencies in one place. Highly recommended!
Wow, this step-by-step guide is so helpful! I was struggling with adding money to my Trust Wallet, but now I feel confident following these instructions. Trust Wallet is amazing!
Thanks for the step-by-step guide! I followed each instruction and successfully added funds to my Trust Wallet. It’s so convenient to have all my cryptocurrency stored in one place.
This guide was very helpful! I followed the steps and was able to easily add money to my Trust Wallet. Thank you for the clear instructions!
How long does it usually take for the funds to appear in the Trust Wallet after they are sent?
Usually, the funds will appear in your Trust Wallet shortly after they are sent. The time it takes for the funds to appear may vary depending on network congestion and the specific cryptocurrency being transferred. In most cases, you should see the funds in your wallet within a few minutes. However, if there are any delays, it’s best to reach out to Trust Wallet’s customer support for assistance.
Great article! But what happens if I enter the wrong wallet address? Can I still recover my funds?
Hi Mary84! If you accidentally enter the wrong wallet address, it can be quite tricky to recover your funds. However, there are a few things you can try. Firstly, double-check the address you provided and make sure it matches the one you intended to use. If the wrong address belongs to someone you know, you can contact them and ask if they can return the funds. Unfortunately, if the wrong address doesn’t belong to anyone you know or you’re unable to contact them, it’s highly unlikely that you’ll be able to recover your funds. That’s why it’s crucial to always double-check and verify the wallet address before initiating a transaction. Better safe than sorry! Hope this helps!
How long does it usually take for the funds to appear in the Trust Wallet after they are sent?
Hi Jessica89! The time it takes for the funds to appear in your Trust Wallet can vary depending on the network congestion and the specific cryptocurrency you are depositing. Generally, it can take anywhere from a few minutes to a few hours for the funds to be confirmed and appear in your wallet. However, in some cases, it may take longer due to high network traffic or other factors. It’s always recommended to check the transaction status on the blockchain explorer for the specific cryptocurrency you are using. I hope this helps! If you have any more questions, feel free to ask.
Great guide! I followed the steps and managed to add money to my Trust Wallet without any issues. It was very straightforward and easy to understand. Now I can securely store and manage my cryptocurrencies. Thanks!
Can I add multiple cryptocurrencies to my Trust Wallet at the same time?
Yes, Michelle84! You can add multiple cryptocurrencies to your Trust Wallet at the same time. Trust Wallet supports a wide range of cryptocurrencies, so you can easily deposit and manage different digital assets in one place. Follow the steps mentioned in the article to add the desired cryptocurrencies to your Trust Wallet. Happy investing!
Thanks for the step-by-step guide! It’s really helpful for beginners like me who are new to Trust Wallet and cryptocurrencies. I followed the instructions and successfully added money to my wallet. Now I can start investing in different cryptocurrencies. Keep up the good work!
Thanks for the step-by-step guide! I was able to easily add funds to my Trust Wallet using these instructions. Trust Wallet is definitely a reliable and secure option for managing cryptocurrencies.
Great guide! I followed these steps and successfully added funds to my Trust Wallet. Now I can easily manage my cryptocurrencies. Thanks for the helpful instructions!
This guide is very helpful. I followed the steps and successfully added money to my Trust Wallet. Now I can easily manage my cryptocurrencies. Thank you for the detailed instructions!
Thank you for this helpful guide! I followed the steps and successfully added money to my Trust Wallet. Now I can easily manage my cryptocurrencies. Great job!
Thanks for the detailed guide! I followed the steps and was able to add funds to my Trust Wallet without any issues. Trust Wallet is such a convenient and secure way to store my cryptocurrencies. Highly recommend it!
This step-by-step guide is really helpful! I was wondering how to add funds to my Trust Wallet and now I know exactly what to do. Trust Wallet is a great app for securely managing cryptocurrencies. Thanks for the clear instructions!
This guide was super helpful! I followed the steps and was able to easily add funds to my Trust Wallet. Thanks for the clear instructions!
I just followed this step-by-step guide to add money to my Trust Wallet and it was so easy! Trust Wallet really makes it simple to manage my cryptocurrencies. Highly recommend for anyone looking to securely store their digital assets.
Do you have to pay any fees when adding money to Trust Wallet?
Yes, there may be some fees associated with depositing money into Trust Wallet, depending on the specific cryptocurrency you are using and the network fees at the time of the transaction.
Do you really need to have the Trust Wallet app installed in order to add funds?
Yes, you must have the Trust Wallet app installed on your device to add funds. Follow the step-by-step guide provided in the article to deposit money into your Trust Wallet easily.
How can I add different types of cryptocurrencies to my Trust Wallet? Are there any limitations on the types of coins I can deposit?
Hi Emily_1985, you can easily add different types of cryptocurrencies to your Trust Wallet. Trust Wallet supports a wide range of coins, so there are no limitations on the types you can deposit. Simply follow the steps outlined in the article to deposit your desired cryptocurrency into your wallet! If you encounter any issues, feel free to ask for further assistance.
Thank you for this helpful guide! I followed the steps and successfully added money to my Trust Wallet. It’s great to have a secure way to manage my cryptocurrencies.
Adding funds to my Trust Wallet has never been easier! I followed these steps and within minutes, my cryptocurrencies were safely deposited in my wallet. Highly recommend this guide!
Thanks for the detailed guide on how to add funds to Trust Wallet! I appreciate the clear instructions and easy steps outlined here. Looking forward to depositing my cryptocurrencies with confidence.
Thanks for the detailed guide! Adding money to my Trust Wallet is now a breeze. I appreciate the clear steps provided, making the whole process seamless and secure.
Adding funds to your Trust Wallet is crucial for managing your cryptocurrencies efficiently. This step-by-step guide simplifies the process and ensures a secure transaction. Make sure to follow each step carefully to top up your wallet with ease!
How can I ensure that the funds I deposit into my Trust Wallet are secure and protected?
To ensure that the funds you deposit into your Trust Wallet are secure and protected, make sure to enable all available security features offered by the Trust Wallet app. This includes setting up a strong password, enabling two-factor authentication, and regularly backing up your wallet’s recovery phrase. Additionally, avoid sharing your wallet address or recovery phrase with anyone to prevent unauthorized access to your funds. By following these security measures, you can enhance the safety of your deposited funds in Trust Wallet.
Adding money to Trust Wallet couldn’t be easier! I followed this step-by-step guide and in no time, my funds were safely deposited into my wallet. Trust Wallet is definitely a user-friendly platform for managing cryptocurrencies.
Can I add multiple cryptocurrencies to my Trust Wallet following these steps?
Yes, you can add multiple cryptocurrencies to your Trust Wallet by following the same steps for each currency. Simply repeat the process outlined in the step-by-step guide for each cryptocurrency you want to deposit into your wallet.
Thanks for the detailed guide! I appreciate how straightforward the steps are, making it easy for beginners like me to add money to my Trust Wallet.
Excuse me, but could you clarify if Trust Wallet has any fees associated with depositing funds?
Hi Alice94, yes, Trust Wallet may have fees associated with depositing funds depending on the cryptocurrency you are using. It’s always recommended to check the specific fee structure of the cryptocurrency you are depositing into your Trust Wallet to have a clear understanding of any potential charges. Hope this helps!
Thanks for the detailed guide on how to add money to Trust Wallet! I followed the steps and successfully deposited funds into my wallet. It’s great to have a secure way to manage my cryptocurrencies.
Are you wondering how to add funds to your Trust Wallet? Can you explain more about the security measures in place for storing cryptocurrencies in the Trust Wallet?
Yes, adding funds to Trust Wallet is quite simple following the steps provided. As for security measures, Trust Wallet employs industry-leading encryption techniques to ensure the safety of your cryptocurrencies. Your funds are securely stored on your device, providing you with full control over your assets. Additionally, Trust Wallet allows you to set up a secure password and enables biometric authentication for added protection. Rest assured, your digital assets are in safe hands with Trust Wallet.
Thanks for the detailed guide! I always get a bit nervous when dealing with cryptocurrencies, but your step-by-step instructions made it so easy to add funds to my Trust Wallet. Now I feel more confident in managing my digital assets.
Thanks for the detailed guide on how to add money to Trust Wallet! I found it very helpful and easy to follow. Will definitely be using these steps to deposit funds into my wallet. Trust Wallet is a great platform for managing cryptocurrencies.
Adding money to Trust Wallet is simple and secure with this step-by-step guide. Trust Wallet provides a convenient way for users to manage their cryptocurrencies. Make sure to follow the instructions carefully to easily deposit funds into your wallet and start using them for transactions.
Adding funds to Trust Wallet is essential for managing your cryptocurrencies efficiently. Trust Wallet offers a user-friendly interface, making it easy to navigate through the process of depositing money. I recommend following the step-by-step guide provided in the article to ensure a smooth transaction experience.
Adding funds to Trust Wallet is so easy with this step-by-step guide! I appreciate the clear instructions provided to deposit money into my wallet effortlessly. Trust Wallet has truly made managing my cryptocurrencies a seamless experience.
Are you wondering how to add funds to your Trust Wallet? Can you also explain how to withdraw money from Trust Wallet?
Sure thing! To withdraw money from your Trust Wallet, follow these steps:
Step 1: Open the Trust Wallet app on your mobile device.
Step 2: Tap on the cryptocurrency you want to withdraw.
Step 3: Click on the “Send” or “Withdraw” button.
Step 4: Enter the recipient’s wallet address where you want to send the funds.
Step 5: Input the amount you wish to withdraw.
Step 6: Review the transaction details and confirm the withdrawal.
Step 7: The funds will be transferred to the provided wallet address.
That’s all you need to do to withdraw money from your Trust Wallet. Enjoy!
Adding funds to your Trust Wallet is essential for managing your cryptocurrencies efficiently. This step-by-step guide provides a clear and easy-to-follow process for depositing money into your wallet. It’s crucial to ensure the security of your wallet address when receiving funds. Trust Wallet’s user-friendly interface makes it convenient for users to store and access their digital assets securely.
Thanks for the detailed guide on adding money to Trust Wallet! I followed the steps and successfully deposited funds into my wallet. It’s great to have a secure way to manage my cryptocurrencies.
I just followed these steps and it was so easy to add money to my Trust Wallet! This guide was really helpful and straightforward. Now I can easily manage my cryptocurrencies on the go. Thank you for the clear instructions!
Are you curious about the safety measures involved in depositing money into Trust Wallet? Could you provide more information on how Trust Wallet ensures the security of funds?
Sure thing, Emma_Smith21! Trust Wallet ensures the security of funds through various encryption methods and secure wallet protocols. Your funds are stored locally on your device, meaning you have full control. In addition, Trust Wallet regularly updates its security features to protect against potential threats. Rest assured, your funds are in safe hands with Trust Wallet!
How do I know if the funds have been successfully added to my Trust Wallet after following these steps?
Once the funds have been sent to your wallet address and they have been confirmed on the blockchain network, you will see the updated balance in your Trust Wallet. You can also check your transaction history within the app to verify the successful addition of funds. If you encounter any issues, feel free to reach out to Trust Wallet’s customer support for assistance.
Great guide! I appreciate the clear instructions on how to add money to Trust Wallet. It made the process so much easier for me. Trust Wallet is indeed a convenient way to manage cryptocurrencies.
Adding money to Trust Wallet was so easy with this guide! I followed the steps and now my funds are safely stored in my wallet. Thanks for the helpful instructions.
Adding money to my Trust Wallet was so easy with this step-by-step guide! I followed the instructions and got my funds deposited in no time. Trust Wallet is definitely my go-to for managing cryptocurrencies now.
Do you have to pay any fees when adding funds to Trust Wallet?
Yes, Megan87, there may be fees involved when adding funds to Trust Wallet. The fees usually depend on the cryptocurrency you are transferring and the network congestion at that time. It’s recommended to check the current fee structure within the Trust Wallet app before making a deposit. Happy investing!
Adding money to Trust Wallet was so easy following this guide! Trust Wallet really simplifies the process of managing cryptocurrencies. Highly recommend!
Adding funds to your Trust Wallet is essential for convenient cryptocurrency management. Trust Wallet offers a user-friendly interface, making it easy for users to securely store and access their digital assets. Follow the step-by-step guide provided here to effortlessly deposit money into your Trust Wallet and start managing your cryptocurrencies effectively.
Adding money to Trust Wallet seems straightforward with these clear instructions. I appreciate having a detailed guide to easily top up my cryptocurrency funds. Trust Wallet has become my go-to option for securely managing my digital assets.
Thanks for the detailed guide on adding money to Trust Wallet! I appreciate the clear instructions and visuals provided. It seems like a straightforward process to deposit funds into the wallet, making it convenient to manage my cryptocurrencies.
I appreciate this detailed guide on how to add money to Trust Wallet. It’s essential for users to have clear instructions like these to ensure a smooth process when depositing funds. Trust Wallet seems like a secure option for managing cryptocurrencies, and I look forward to using it for my transactions.
I found this guide very helpful in adding money to my Trust Wallet. The step-by-step instructions were clear and easy to follow. I appreciate the concise explanation on how to deposit funds into my wallet. Trust Wallet has now become my go-to for managing my cryptocurrencies!
Adding money to Trust Wallet was so easy following these steps! Trust Wallet really makes it simple to deposit funds and manage cryptocurrencies. I recommend it to anyone looking for a user-friendly mobile wallet.
Thanks so much for this guide! I was a bit confused at first, but now I feel confident in adding funds to my Trust Wallet. It’s really convenient to have all the steps laid out like this.
Adding money to Trust Wallet is so easy with this step-by-step guide! I had no idea how to do it before, but now I feel confident managing my cryptocurrencies. Thanks for the great instructions!
I found this guide really helpful! Adding money to my Trust Wallet was a breeze with these clear steps. I appreciate the detailed explanation on how to use the app. It’s great to finally have a simple way to manage my cryptocurrencies!
I’ve been using Trust Wallet for a few months now, and adding money is super easy with this guide! The step-by-step instructions made it clear, and I didn’t encounter any issues. Highly recommend it for anyone looking to manage their crypto effectively!
I just followed this guide to add funds to my Trust Wallet and it was super simple! The step-by-step instructions were clear and the app interface is really user-friendly. I’m glad I finally have a safe place to manage my cryptocurrencies. Highly recommend this for anyone looking to get started!
Thanks for the clear guide! Can I use a debit card to add money directly to my Trust Wallet, or do I need to deposit from another exchange first?
Great question, Jessica! Unfortunately, Trust Wallet does not allow direct debit card deposits. You’ll need to purchase cryptocurrency through an exchange first, then transfer it to your Trust Wallet. I recommend using popular exchanges like Coinbase or Binance to get started.
Thanks for the guide! I’m curious, what are the best cryptocurrencies to use for topping up my Trust Wallet?
You’re welcome, John! Great question. Some of the best cryptocurrencies for topping up are Bitcoin (BTC), Ethereum (ETH), and Binance Coin (BNB), as they are widely accepted and have a strong market presence. Happy investing!
I found this guide super helpful! I was a bit confused about the steps to add money to my Trust Wallet, but now I feel confident doing it myself. The instructions were clear, and I appreciate the tips on using the QR code. Great job on breaking it down!
I recently followed this guide to add money to my Trust Wallet, and it was a breeze! The steps were clear and easy to understand. I appreciate how straightforward it was to get everything set up. Highly recommend this guide for anyone looking to dive into cryptocurrency!
I’ve been using Trust Wallet for a while now, and this guide made it so easy to add funds! I love how straightforward the process is. Just wish I had found this sooner!
Great guide! I followed the steps, but could you clarify what to do if I accidentally send funds to the wrong wallet address?
Thanks for your feedback, Jessica! If you accidentally send funds to the wrong wallet address, unfortunately, there’s not much you can do to recover them, as transactions on the blockchain are irreversible. However, you can double-check your transaction history to ensure it’s indeed gone or consult with the customer support of the wallet service you used for any advice.
I found this guide incredibly helpful! Adding money to my Trust Wallet was easier than I expected. I appreciate how clear the steps were—definitely a great resource for anyone new to crypto. Thanks for putting this together!
I’ve just added money to my Trust Wallet, and the process was so simple! The step-by-step guide made everything clear and easy to follow. I appreciate how user-friendly the app is. Can’t wait to start using my cryptocurrencies more efficiently!
I just followed this guide to add money to my Trust Wallet, and it was incredibly easy! The step-by-step instructions are clear and straightforward. I didn’t run into any issues, and now I can manage my cryptocurrencies without any hassle. Highly recommend this guide for anyone who’s new to Trust Wallet!
I found this guide incredibly helpful! Adding money to my Trust Wallet was a bit daunting at first, but following these steps made it super easy. I’m glad I can securely manage my cryptocurrencies now. Thank you for breaking it down!
I just followed this guide, and it was super helpful! Adding funds to my Trust Wallet was a breeze. I especially appreciated the clear steps. Thanks for making it so easy!
I just followed this guide to add money to my Trust Wallet, and it was super easy! The step-by-step approach really helped me, especially with the wallet address part. I appreciate how clear the instructions were. I feel much more confident now managing my cryptocurrencies. Thanks for sharing!
I found this guide incredibly helpful! Adding money to my Trust Wallet was much easier than I expected. The step-by-step instructions made the process straightforward, and now I feel more confident using cryptocurrencies. Thanks for the clarity!
Thanks for the guide! I’m curious, is there a limit to how much I can deposit into my Trust Wallet at one time?
You’re welcome, Lisa! As for your question, there isn’t a strict limit imposed by Trust Wallet itself for deposits, but it mainly depends on the cryptocurrency exchange or service you’re using to send funds. Some exchanges may have their own limits, so it’s always best to check with them for specific details.
I just followed the guide to add money to my Trust Wallet, and it was super straightforward! The steps were clear, and I appreciated the visuals. It’s comforting to know my cryptocurrencies are stored securely. Highly recommend this app for anyone looking to manage their digital assets easily!
This guide is super helpful! I’m wondering if there’s a limit on how much I can deposit into my Trust Wallet at one time?