Including the Binance Smart Chain (BSC) network in Metamask allows you to connect with the thriving ecosystem of decentralized finance (DeFi) and decentralized applications (DApps) built on BSC. By adding BSC to Metamask, you can seamlessly move your assets between Ethereum and BSC, take advantage of lower transaction fees, and explore the wide range of innovative projects available on BSC.
So how exactly can you add BSC to Metamask? It’s a straightforward process that requires a few simple steps. First, you need to open your Metamask extension and click on the network dropdown menu. Then, select “Custom RPC” to add a custom network. In the network settings, you’ll need to fill in the details for the BSC network, including the network name, RPC URL, chain ID, symbol, and block explorer URL.
Once you’ve entered all the necessary information, click on “Save” to add the BSC network to Metamask. After adding the network, you’ll be able to connect your Metamask wallet to the BSC network and start exploring the exciting world of BSC-based DeFi and DApps.
Adding BSC to Metamask opens up a whole new realm of possibilities for crypto enthusiasts. Whether you’re looking to participate in yield farming, invest in new token launches, or simply explore the vibrant BSC ecosystem, connecting Metamask to the BSC network is an essential step. Follow this step-by-step guide, and you’ll be ready to tap into the limitless potential of BSC in no time.
Prerequisites for Adding BSC to Metamask
Before you can connect to the Binance Smart Chain (BSC) in Metamask, there are a few prerequisites you need to have in place. This step-by-step guide will walk you through everything you need to know to add BSC to your Metamask network.
1. Install Metamask Extension
In order to connect to the Binance Smart Chain in Metamask, you need to have the Metamask extension installed on your web browser. If you haven’t installed it yet, you can find it on the official Metamask website or the appropriate extension store for your browser.
2. Set Up Metamask Account
If you haven’t done so already, you’ll need to set up a Metamask account. Open the Metamask extension in your browser and follow the prompts to create a new account. Make sure to securely back up your seed phrase, as it will be needed for account recovery.
3. Fund Your Metamask Account
Before you can start using the Binance Smart Chain in Metamask, you’ll need to have some funds in your account. Make sure you have some Binance Smart Chain tokens (BSC) or Ethereum (ETH) in your Metamask wallet.
4. Add BSC Network
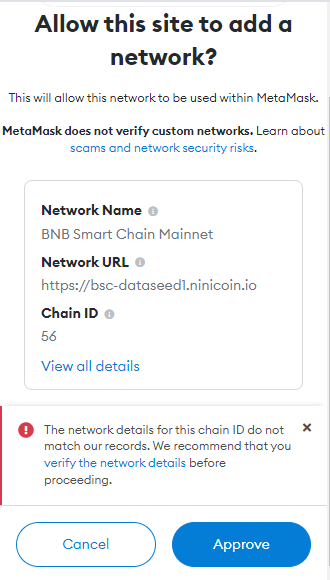
To connect to the Binance Smart Chain, you’ll need to add the BSC network to your Metamask. Open the Metamask extension and click on the network dropdown. Select “Custom RPC” and enter the following details:
- Network Name: Binance Smart Chain
- New RPC URL: https://bsc-dataseed.binance.org/
- Chain ID: 56
- Symbol: BNB
- Block Explorer URL: https://bscscan.com
Click “Save” to add the Binance Smart Chain network to your Metamask.
5. Switch to BSC Network
Now that you have added the BSC network to Metamask, you can switch to it by selecting “Binance Smart Chain” from the network dropdown in the Metamask extension. This will enable you to interact with smart contracts and decentralized applications (dApps) on the Binance Smart Chain network.
Conclusion
By following these steps, you can easily connect to and add the Binance Smart Chain network to your Metamask. This will allow you to explore and participate in the growing ecosystem of decentralized finance (DeFi) applications and projects on the Binance Smart Chain.
Step 1: Install Metamask Extension
To add BSC to Metamask, you first need to have the Metamask extension installed on your browser. Metamask is a cryptocurrency wallet that allows you to store, manage, and interact with decentralized applications (DApps) on the Ethereum network, and by following these steps, you can add the Binance Smart Chain (BSC) network to your Metamask wallet.
Here’s how to install the Metamask extension:
- Open your preferred browser and go to the official Metamask website.
- Click on the “Get Chrome Extension” or “Get Firefox Extension” button, depending on your browser.
- You will be redirected to the respective browser’s extension page. Click on the “Add to Chrome” or “Add to Firefox” button to start the installation process.
- Once the installation is complete, you will see the Metamask icon in your browser’s toolbar.
- Click on the Metamask icon to open the extension. A welcome screen will appear.
- Click on the “Get Started” button to proceed.
- Set up a new wallet or import an existing one by following the on-screen instructions. Make sure to create a strong password and securely back up your seed phrase.
- Once your wallet is set up, you will be greeted with the main Metamask interface.
- At this point, Metamask is ready to use, but it is currently connected to the Ethereum network.
Now that you have Metamask installed and set up, you can proceed to the next step to add the BSC network to your Metamask.
Step 2: Create or Import a Metamask Wallet
To add the Binance Smart Chain (BSC) network to your Metamask, you need to have a Metamask wallet. If you already have a wallet, you can skip this step.
If you don’t have a Metamask wallet, follow the steps below to create one:
- Go to the Metamask website by clicking here.
- Click on the “Get Started” button to download the Metamask extension for your browser.
- Once the extension is installed, click on the Metamask icon in your browser’s toolbar to open the extension.
- Click on the “Create a Wallet” button to start the wallet creation process.
- Follow the on-screen instructions to set up your wallet, including creating a strong password and backing up your seed phrase.
- Once your wallet is created, you will be automatically directed to your wallet dashboard.
If you already have a Metamask wallet and want to import it into Metamask, follow the steps below:
- Open the Metamask extension by clicking on the icon in your browser’s toolbar.
- Click on the account icon at the top right corner of the Metamask window.
- Click on the “Import Account” button.
- Enter your 12-word seed phrase or import a private key.
- Follow the on-screen instructions to complete the import process.
Once you have created or imported your Metamask wallet, you can proceed to the next step to connect it to the Binance Smart Chain network.
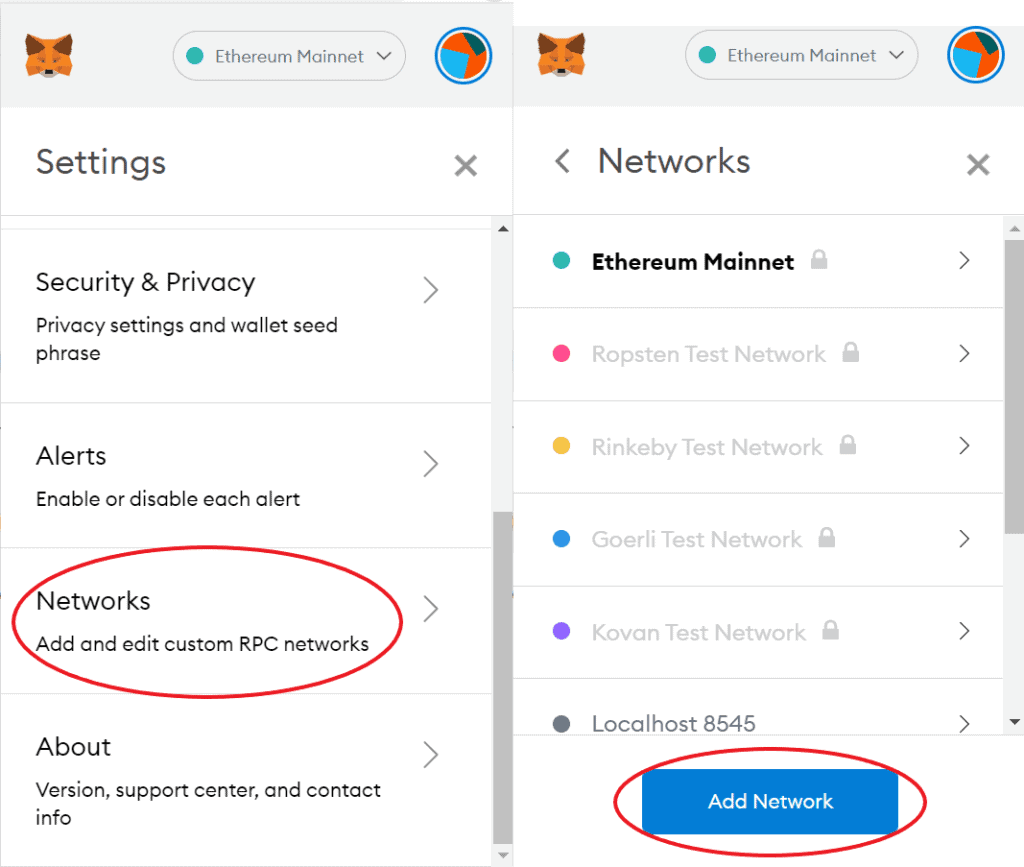
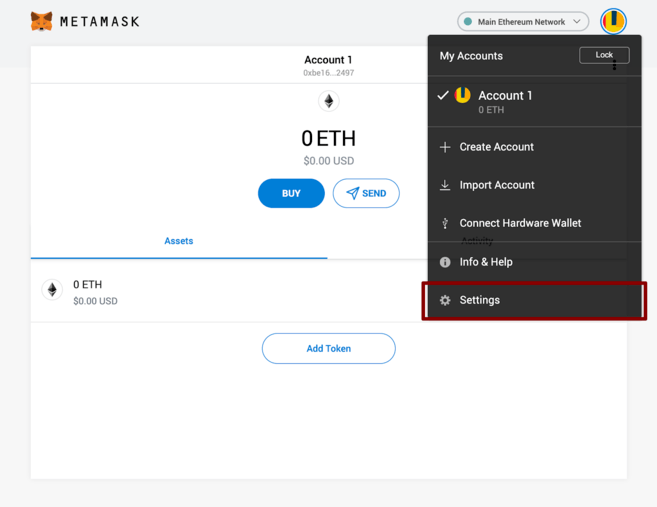
Step 3: Access the Metamask Settings
After installing and setting up your Metamask extension in your browser, you will need to access the settings to add the BSC network.
- Open your browser and click on the Metamask extension icon in the toolbar. It usually appears as a fox logo, but it may vary depending on your browser.
- A small window will pop up with the Metamask logo and account details. Click on the account icon located at the top right corner.
- A dropdown menu will appear. Find and click on the “Settings” option.
- This will take you to the Metamask settings page.
- Scroll down until you find the “Networks” section. This is where you can add and manage different blockchain networks.
- Click on the “Add Network” button to start adding the BSC network.
By following these steps, you will reach the Metamask settings page, where you can add the BSC network to your Metamask extension. In the next step, we will guide you on how to connect to the BSC network once it is added.
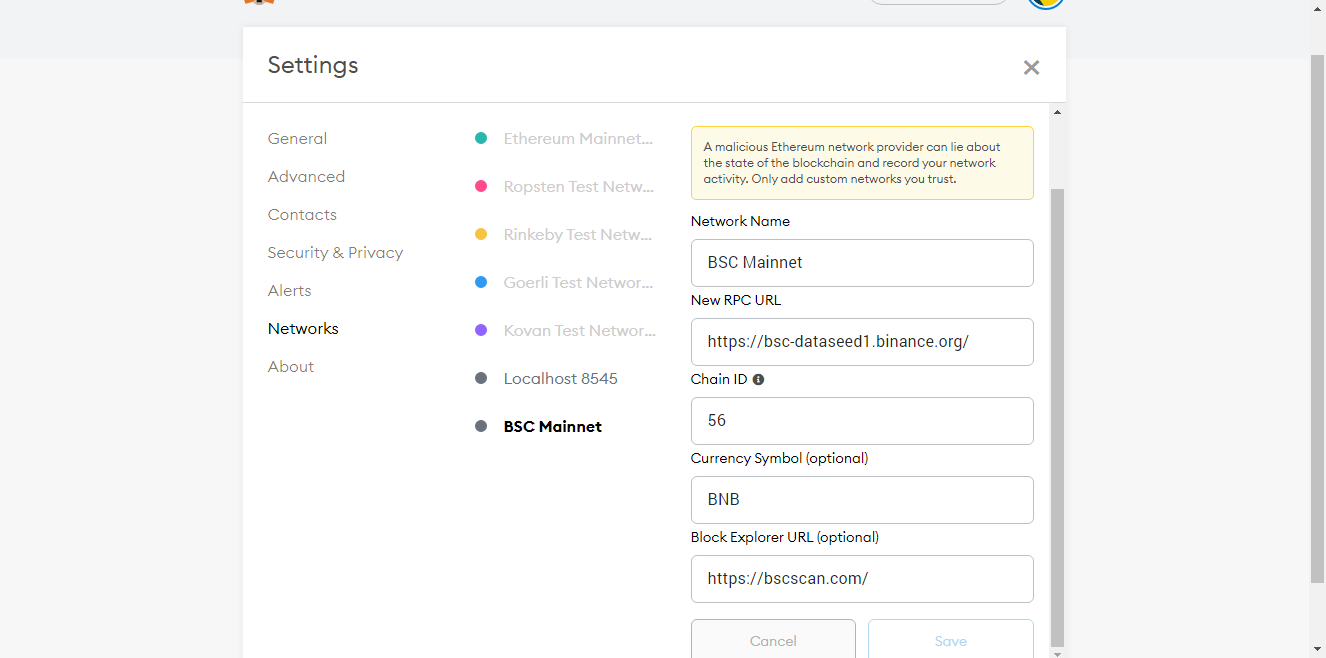
Step 4: Add Binance Smart Chain Network
Once you have successfully installed and set up MetaMask, the next step is to add the Binance Smart Chain (BSC) network to your MetaMask.
- Open your MetaMask extension in your browser and make sure you are on the main page.
- Click on the network dropdown on the top of the MetaMask window.
- Scroll down and click on “Custom RPC” to manually add a new network.
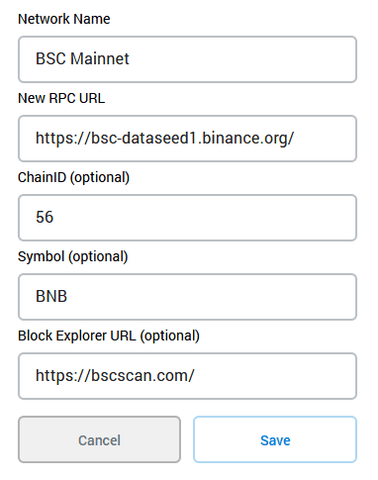
- In the “New RPC URL” field, enter the Binance Smart Chain RPC URL: https://bsc-dataseed.binance.org/.
- Enter a name for the network, like “BSC Mainnet”.
- Under “Chain ID”, enter the Binance Smart Chain Chain ID, which is 56.
- Leave the “Symbol” and “Block Explorer URL” fields empty, as they are optional.
- Click on “Save” to add the Binance Smart Chain network to your MetaMask.
Once you have added the Binance Smart Chain network to your MetaMask, you will be able to connect to it and use BSC tokens and decentralized applications (dApps) within the MetaMask interface.
Note: It’s important to always double-check the RPC URL and Chain ID to ensure you are connecting to the correct Binance Smart Chain network.
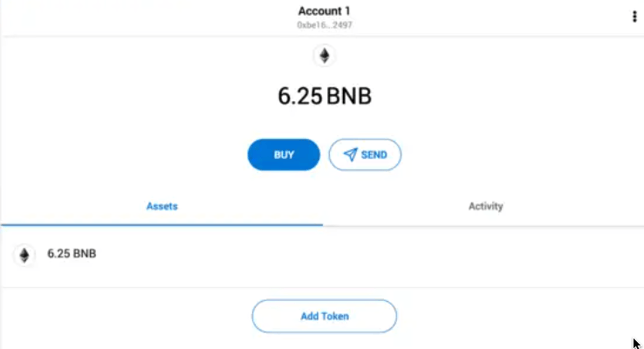
Step 5: Configure BSC Network Settings
Now that you have added the BSC network to your Metamask, you need to configure the network settings to connect to the BSC network.
- Open your Metamask extension in your browser.
- Click on the network selection dropdown, located at the top of the Metamask interface.
- Select the “BSC Mainnet” network from the list of available networks.
- Your Metamask will automatically connect to the BSC network.
Note: If you have added custom tokens or contracts to your Metamask, you will need to manually add them to the BSC network as well. This ensures that you can view and interact with your tokens on the BSC network.
To add custom tokens to the BSC network:
- Open your Metamask extension in your browser.
- Click on the Metamask menu icon (three horizontal lines) located at the top left corner of the Metamask interface.
- Select the “Settings” option from the menu.
- In the settings menu, click on the “Networks” tab.
- Under the “Networks” tab, you will find a list of networks. Find and click on the “BSC Mainnet” network.
- Scroll down to the “Tokens” section and click on the “Add Token” button.
- A form will appear where you can add the token contract address, token symbol, and decimals.
- Fill in the required details and click on the “Add” button to add the token to the BSC network.
By following these steps, you can configure the BSC network settings in Metamask, including adding custom tokens or contracts to the BSC network. Now you are ready to connect to the BSC network and start using it with your Metamask!
Step 6: Connect Metamask to BSC
Now that you have added BSC to Metamask, the next step is to connect your Metamask wallet to the BSC network. This will allow you to perform transactions and interact with dApps on the Binance Smart Chain.
To connect Metamask to BSC, follow these steps:
- Click on the Metamask extension icon in your browser to open the Metamask wallet.
- In the Metamask wallet, click on the dropdown menu that displays the current network (usually set to “Ethereum Mainnet” by default).
- Scroll down and click on the “Custom RPC” option.
- In the “Custom RPC” screen, enter the following details for the BSC network:
| Network Name: | Binance Smart Chain |
| New RPC URL: | https://bsc-dataseed.binance.org/ |
| Chain ID: | 56 |
| Symbol: | BNB |
| Block Explorer URL: | https://bscscan.com/ |
Make sure to double-check that you have entered the correct details before proceeding.
- Once you have entered the details, click on the “Save” button to add the BSC network to Metamask.
- Your Metamask wallet is now connected to the BSC network. You can confirm the connection by checking the network displayed in the Metamask extension.
Congratulations! You have successfully connected Metamask to the BSC network, allowing you to interact with dApps and perform transactions on the Binance Smart Chain.
Note: Adding BSC to Metamask enables you to switch between networks easily. You can switch between Ethereum Mainnet and BSC by clicking on the network dropdown in the Metamask wallet and selecting the desired network.
Step 7: Verify the BSC Network Connection
Once you have added the BSC network to Metamask, you need to verify that the connection is successful.
- Click on the Metamask extension in your browser to open the wallet.
- In the top right corner, click on the network selection dropdown (it will display “Ethereum Mainnet” by default).
- Scroll down and select the BSC network from the list of networks.
- You will see a prompt asking if you want to switch to the BSC network. Click “Switch” to confirm.
- After switching to the BSC network, make sure that the network name at the top of the Metamask window changes to “Binance Smart Chain”.
If the network name is displayed as “Binance Smart Chain” and the blockchain explorer URL starts with “https://bscscan.com”, then congratulations! You have successfully connected to the BSC network using Metamask.
Additional Tips and Troubleshooting
If you encounter any issues while adding BSC to Metamask or connecting to the network, here are some additional tips and troubleshooting steps to help you resolve them:
1. Checking Internet Connection
Ensure that you have a stable internet connection before attempting to connect your Metamask to the BSC network. Unstable internet connections can cause connection errors and delays.
2. Restarting Metamask
If you’re experiencing issues with connecting to the BSC network or adding it to Metamask, try restarting the Metamask extension. This can help resolve any temporary glitches or connection issues.
3. Clearing Cache and Cookies
If restarting Metamask doesn’t solve the issue, try clearing your browser cache and cookies. Sometimes, cached data can interfere with the connection process. After clearing the cache, restart your browser and try connecting to the BSC network again.
4. Using the Correct Network RPC URL
Make sure you are using the correct Binance Smart Chain (BSC) network RPC URL when setting up the custom network in Metamask. The RPC URL is essential for connecting to the correct network.
5. Confirming the Correct Chain ID
Double-check that you have entered the correct Chain ID when adding the BSC network to Metamask. The Chain ID for the BSC mainnet is usually “56”. Entering the wrong Chain ID can result in connection issues.
6. Adjusting Gas Fees
If you encounter high gas fees or transaction rejections on the BSC network, you can manually adjust the gas fees in Metamask. Higher gas fees may speed up transactions, but they can also make them more expensive. Lower gas fees may lead to slower transaction times but cost less.
7. Seeking Help from the Community
If you still can’t connect to the BSC network or resolve any issues with Metamask, it can be helpful to seek assistance from the online community. Various forums and social media platforms dedicated to Metamask and BSC can provide valuable insights and support.
Remember to exercise caution and verify the information provided by community members before implementing any suggestions or troubleshooting steps.
By following these additional tips and troubleshooting steps, you should be able to successfully add and connect to the Binance Smart Chain (BSC) network in Metamask.
Frequently asked questions:
What is Metamask and how can I add BSC to it?
Metamask is a cryptocurrency wallet and browser extension that allows users to interact with decentralized applications (dApps) on the Ethereum network. To add Binance Smart Chain (BSC) to Metamask, you need to follow a step-by-step guide. Here’s how you can do it:
Is it possible to connect BSC to Metamask?
Yes, it is possible to connect Binance Smart Chain (BSC) to Metamask. You can do so by adding BSC network to Metamask using the custom RPC settings. This will allow you to interact with dApps and perform transactions on the BSC network using your Metamask wallet.
What are the benefits of adding BSC to Metamask?
Adding Binance Smart Chain (BSC) to Metamask comes with several benefits. Firstly, it allows you to access and interact with decentralized applications (dApps) that are built on the BSC network. Secondly, it enables you to perform transactions on the BSC network using your Metamask wallet. Lastly, it provides you with more options for managing and diversifying your cryptocurrency holdings.
Why should I add BSC network to Metamask?
You should add Binance Smart Chain (BSC) network to Metamask if you want to access and interact with dApps on the BSC network. By adding BSC network to Metamask, you expand your options for participating in the BSC ecosystem, performing transactions, and managing your cryptocurrency holdings. It allows you to take advantage of the features and opportunities available on the BSC network.
Are there any risks involved in adding BSC to Metamask?
Adding Binance Smart Chain (BSC) to Metamask does not inherently involve any risks. However, it is important to note that when interacting with dApps and performing transactions on any blockchain network, there are always risks associated with security, scams, and potential loss of funds. It is essential to exercise caution, do thorough research on the dApps and projects you engage with, and take appropriate security measures to protect your assets.
Videos:
How to add Binance Smart Chain BSC to Metamask?
How to Set Up Metamask and Use Uniswap | Step-by-Step Tutorial
Step-By-Step Guide: Create, Deploy and Add Liquidity. BSC BEP 20 Token – Binance Smart Chain
Adding BSC to Metamask made a huge difference for me. Now I can easily navigate through the BSC network and take advantage of the low transaction fees. It’s definitely a game-changer!
Adding BSC to Metamask is a game-changer! I’ve been able to seamlessly connect my wallet to the BSC network and explore the wide range of innovative projects available. The step-by-step guide made it super easy for me to get started. Thanks!
Can you please explain how to add the BSC network to Metamask? I’m interested in exploring the decentralized applications and tokens on the Binance Smart Chain.
Sure, I’d be happy to explain how to add the BSC network to Metamask. Adding the Binance Smart Chain (BSC) network to your MetaMask wallet is a simple process that can be done in a few easy steps. First, open your MetaMask extension and click on the network dropdown menu. Then, select “Custom RPC” to add a custom network. In the network settings, fill in the details for the BSC network, including the network name, RPC URL, chain ID, symbol, and block explorer URL. Once you’ve entered all the necessary information, click on “Save” to add the BSC network to MetaMask. After adding the network, you’ll be able to connect your wallet to the BSC network and start exploring the wide range of decentralized applications and tokens available on the Binance Smart Chain. Enjoy discovering the vibrant BSC ecosystem!
I recently added BSC to my MetaMask wallet and it was incredibly easy! The step-by-step guide provided in this article helped me connect to the Binance Smart Chain network seamlessly. Now, I can explore a wide range of decentralized applications and tokens on BSC. Highly recommend!
I’ve been using Metamask for a while now and adding BSC to it was a game-changer! It’s so easy to connect and navigate the Binance Smart Chain network. Plus, with the lower transaction fees, I can explore different DApps and projects without worrying about high costs. Highly recommend!
I have followed this guide and successfully added BSC to my Metamask wallet. It was very easy to understand and navigate through the steps. Now I can easily access all the exciting projects on the Binance Smart Chain. Highly recommend!
Thanks for sharing this step-by-step guide! I’ve been wanting to add BSC to my MetaMask wallet and this article explained it perfectly. Can’t wait to explore the BSC ecosystem and discover new DeFi projects!
I just added BSC to my Metamask wallet following these steps and it was incredibly easy! Now I can access all the exciting DApps and tokens on the Binance Smart Chain. Thanks for the guide!
Adding BSC to Metamask has been a game-changer for me! I can now easily access all the exciting DeFi projects on the Binance Smart Chain and take advantage of lower transaction fees. It’s simple to set up, and I highly recommend it to anyone interested in exploring the BSC ecosystem.
This article is very helpful! I followed the step-by-step guide and successfully added BSC to my Metamask wallet. Now I can easily access DApps and tokens on the Binance Smart Chain. The process was straightforward and the instructions were clear. Thank you!
Great article! Can you please explain what the benefits of adding BSC to Metamask are?
Sure! Adding BSC to Metamask brings several benefits. Firstly, it allows you to seamlessly transfer your assets between Ethereum and BSC, taking advantage of lower transaction fees on BSC. Secondly, it opens up the opportunity to explore the wide variety of innovative projects and decentralized applications (DApps) available on the Binance Smart Chain. Lastly, by connecting with the BSC network, you can tap into the thriving ecosystem of decentralized finance (DeFi) on BSC. Overall, it’s a great way to expand your crypto horizons. Enjoy!
I recently added BSC to my Metamask and it’s been a game-changer! Being able to seamlessly move my assets between Ethereum and BSC is fantastic. The lower transaction fees on BSC are a huge advantage too. I highly recommend adding BSC to your Metamask and exploring the amazing projects on the Binance Smart Chain.
Adding BSC to Metamask is a game-changer! It’s so easy to connect and explore the world of decentralized finance and applications on the Binance Smart Chain. I can’t wait to dive into the exciting projects and opportunities available on BSC.
Adding BSC to Metamask has been a game-changer for me! I’ve been able to easily connect with various DApps and explore the innovative projects on the BSC network. The process was straightforward and the lower transaction fees are a major plus. Highly recommend!
Wow, this article explained everything so clearly! I had no idea it was this easy to add BSC to Metamask. Can’t wait to explore the BSC ecosystem and all the exciting projects on there. Thanks for sharing!
Adding BSC to Metamask is a game-changer! I’ve been able to access so many amazing DeFi projects and tokens on the Binance Smart Chain. It’s definitely worth the few simple steps to set it up. Happy exploring!
Is it safe to connect my MetaMask wallet to the BSC network? Are there any risks involved?
Yes, it is safe to connect your MetaMask wallet to the BSC network. MetaMask is a trusted and secure wallet that allows you to interact with various networks, including BSC. However, it’s always important to be cautious and take necessary measures to protect your funds. Make sure to double-check the URLs and only connect to official and verified networks. Stay up to date with the latest security practices and be cautious of phishing attempts. By following these precautions, you can safely explore the BSC ecosystem and enjoy the benefits of decentralized finance.
Could you please explain how to fill in the details for the BSC network? I’m not sure what information I should enter.
Hi Alexandra! I’d be happy to help you with that. To fill in the details for the BSC network in Metamask, you’ll need to enter the following information:
– Network Name: BSC Mainnet
– RPC URL: https://bsc-dataseed.binance.org/
– Chain ID: 56
– Symbol: BNB
– Block Explorer URL: https://bscscan.com/
Once you’ve entered these details, click on “Save” to add the BSC network to Metamask. Feel free to ask if you have any further questions!
Is it possible to switch back to the Ethereum network after adding BSC to Metamask?
Yes, it is possible to switch back to the Ethereum network after adding BSC to Metamask.
To switch back, you just need to follow a few simple steps. First, open your Metamask extension and click on the network dropdown menu. Then, select “Ethereum Mainnet” from the list of available networks.
Once you’ve selected Ethereum Mainnet, your Metamask wallet will be connected to the Ethereum network again, allowing you to access Ethereum-based DeFi projects and tokens.
Remember that switching networks may require you to manually switch your assets between the networks, so make sure to check your wallet balances before making any transactions. Happy exploring!
Adding BSC to Metamask has been a game changer for me. I can easily connect to the BSC network and explore the wide range of innovative projects available on BSC. The process was simple and straightforward, just a few clicks and I was ready to go. Thanks to this integration, I can now take advantage of lower transaction fees and participate in yield farming. Highly recommend it!
Adding BSC to Metamask is a game-changer! I’ve been using it for a while now and it’s made accessing DeFi and DApps on the Binance Smart Chain so much easier. Definitely recommend giving it a try!
Can someone please explain why adding BSC to Metamask is important? What benefits does it bring? Thank you!
Adding BSC to Metamask is important because it allows you to connect with the thriving ecosystem of decentralized finance (DeFi) and decentralized applications (DApps) built on BSC. By adding BSC to Metamask, you can seamlessly move your assets between Ethereum and BSC, take advantage of lower transaction fees, and explore the wide range of innovative projects available on BSC. It opens up a whole new realm of possibilities for crypto enthusiasts, whether they’re into yield farming, investing in new token launches, or simply exploring the vibrant BSC ecosystem. Hope that helps!
Great article! Can you please clarify if adding BSC to Metamask will affect the security of my assets?
Hi Emma_1987, adding BSC to Metamask does not compromise the security of your assets. Metamask is designed to securely handle multiple networks, including BSC. When you add BSC to Metamask, it simply adds another network option for you to connect to. Your assets remain secure as long as you follow best security practices, such as keeping your wallet seed phrase and private keys safe. So feel free to explore the BSC ecosystem without any worries!
Adding BSC to Metamask has been a game-changer for me! Now I can easily navigate through the vast world of BSC-based DeFi and DApps. The step-by-step guide in this article was incredibly helpful. Thanks for sharing!
I recently added BSC to my Metamask wallet and it was a game-changer! The process was simple and now I can easily access DApps and tokens on the Binance Smart Chain. Plus, the lower transaction fees and innovative projects on BSC are definitely worth checking out. Highly recommend!
Adding BSC to Metamask is a game-changer! The straightforward steps outlined in the article make it easy for anyone to connect their wallet to the BSC network. With BSC, you can access a wide range of innovative projects and take advantage of lower transaction fees. It’s a must-do for crypto enthusiasts!
Adding BSC to Metamask is a game-changer! Now I can easily connect with the BSC ecosystem and explore all the exciting DeFi projects on BSC. It’s incredible how simple the process is, just a few clicks and I’m ready to go. Thanks for the step-by-step guide!
Adding BSC to Metamask is a game-changer! I’ve been using it for a while now and the process is super easy. Being able to connect with the BSC ecosystem and explore all the innovative projects is just amazing.
Adding BSC to Metamask is such a game-changer! It’s amazing how easy it is to connect to the Binance Smart Chain network and access all the exciting DApps and tokens. The step-by-step guide was super helpful, and now I can’t wait to explore the vibrant BSC ecosystem!
Can I use this method to add other custom networks to Metamask as well?
Yes, you can definitely use this method to add other custom networks to Metamask. The process is quite similar – you just need to fill in the specific details of the custom network you want to add. Happy exploring!
Adding BSC to Metamask has been a game-changer for me. It has allowed me to seamlessly switch between Ethereum and BSC, saving on transaction fees and giving me access to a wide range of exciting projects. Highly recommend!
I recently added BSC to my Metamask and it was a game-changer! Connecting to Binance Smart Chain has allowed me to access a whole new world of DeFi projects and DApps. Plus, the lower transaction fees are a huge bonus. Highly recommend giving it a try!
Thanks for the guide! I was wondering how to connect my MetaMask to BSC and now I know exactly what to do. Can’t wait to explore the BSC ecosystem and find new opportunities!
I recently added BSC to my Metamask and it was super easy! I love how I can now access all the DApps and tokens on the Binance Smart Chain seamlessly. It’s opened up a whole new world of possibilities for me in the crypto space.
Adding BSC to Metamask is such a game changer! Now I can easily access all the amazing DApps and tokens on the Binance Smart Chain. Thank you for this step-by-step guide!
Can adding BSC to Metamask really help me access decentralized applications and tokens easily?
Yes, adding BSC to Metamask definitely helps you access decentralized applications and tokens easily. By connecting your MetaMask wallet to the BSC network, you can explore the wide range of DApps and tokens built on Binance Smart Chain. It’s a simple process that allows you to seamlessly move your assets between Ethereum and BSC, taking advantage of lower transaction fees. Give it a try and unlock the exciting opportunities offered by the BSC ecosystem!
Adding BSC to Metamask is a game-changer! I’ve been using it for a while now and it’s made accessing DApps on the Binance Smart Chain so much easier. Definitely recommend giving it a try!
Adding BSC to Metamask is a game-changer! I can finally access all the amazing DeFi projects and DApps on the BSC network. It’s so easy to connect and the lower transaction fees are a huge plus. Excited to explore the world of BSC-based crypto!
Adding BSC to Metamask is a game-changer! It allows me to easily access the thriving world of decentralized finance and explore innovative projects on the Binance Smart Chain. The step-by-step guide provided in this article made the process simple and straightforward. I’m excited to take advantage of lower transaction fees and discover new opportunities in the BSC ecosystem!
Adding BSC to Metamask is such a game-changer! I’ve been able to easily navigate the BSC ecosystem and take advantage of the lower fees. The step-by-step guide provided here was super helpful. Thanks for sharing!
Adding BSC to Metamask has been a game-changer for me. I can now easily navigate through the BSC network and explore all the amazing projects available. Highly recommend!
Adding BSC to Metamask has been a game-changer for me! I’ve been able to easily connect with the BSC ecosystem and explore all the exciting DeFi projects. The step-by-step guide in this article was super helpful. Highly recommend it!
Adding BSC to Metamask was a game-changer for me! I can now easily interact with DApps and tokens on the Binance Smart Chain. Highly recommend it!
Thanks for the step-by-step guide! I’ve been meaning to add BSC to my Metamask wallet, and this article has made it so easy to follow. Can’t wait to explore the world of BSC-based DeFi and DApps!
This article is very helpful! I followed the step-by-step guide and successfully added the BSC network to my MetaMask wallet. Now I can easily access DApps and tokens on the Binance Smart Chain. Thank you!
Adding BSC to MetaMask was a game-changer for me! I’m now able to easily navigate the BSC ecosystem and explore all the exciting DeFi projects available. Thanks for the step-by-step guide!
Adding BSC to Metamask was so easy! I followed the steps mentioned in the article and within minutes, I was connected to the BSC network. Now I can explore all the amazing DApps and tokens on BSC. It’s a game-changer for crypto enthusiasts like me!
I have been using Metamask for a while now and adding BSC to it was a game-changer. It’s so easy to connect and explore the world of DeFi and DApps on BSC. The step-by-step guide in this article was really helpful in getting me started. Highly recommend!
This is a great article! Adding BSC to Metamask is essential for anyone who wants to fully explore the world of decentralized finance. I followed the step-by-step guide and it was so easy to connect my Metamask wallet to the BSC network. Now I can easily access all the exciting DApps and tokens on Binance Smart Chain. Highly recommended!
Adding BSC to Metamask is a game-changer! I just followed the step-by-step guide and now I can easily connect to the Binance Smart Chain network. It’s incredible how many innovative projects and opportunities are available on BSC. Can’t wait to explore and take advantage of the lower fees!
Adding BSC to Metamask has been a game-changer for me. I love how easy and seamless it is to connect with the Binance Smart Chain network. Now I can explore all the amazing DeFi projects and DApps available on BSC. Highly recommend!
Adding BSC to Metamask has been a game-changer for me. I can now seamlessly move my assets between Ethereum and BSC, and explore all the amazing DeFi projects on BSC. The step-by-step guide in this article made the process so easy!
Can I use this method to connect my MetaMask to other chains as well or just BSC?
Yes, you can use this method to connect your MetaMask to other chains too. By adding custom RPC, you can connect with various networks and explore different ecosystems. Give it a try!
Adding BSC to Metamask is a game-changer! Now I can easily access all the awesome DeFi projects on the Binance Smart Chain. Thanks for the step-by-step guide!
Adding BSC to Metamask is a game-changer! I’ve been using it for a while now and it has completely transformed my DeFi experience. The process was simple and straightforward, and now I can seamlessly move my assets between Ethereum and BSC. It’s definitely worth giving it a try!
Could you please provide more details on how to fill in the network settings for BSC? I want to make sure I add the correct information.
Sure thing, @crypto_enthusiast92! To fill in the network settings for BSC, you’ll need to input the following details:
– Network Name: Binance Smart Chain
– RPC URL: https://bsc-dataseed.binance.org/
– Chain ID: 56
– Symbol: BNB
– Block Explorer URL: https://bscscan.com/
Once you’ve entered these details, click on “Save” to successfully add the BSC network to your MetaMask. Enjoy exploring the world of decentralized finance on BSC!
Adding BSC to Metamask is a game-changer! It’s so empowering to seamlessly navigate between Ethereum and BSC, all with lower fees. The possibilities on the BSC network are endless. Can’t wait to dive into the world of BSC-based DeFi and DApps!
Adding BSC to Metamask is a game-changer! It’s incredible how seamlessly you can bridge Ethereum and BSC, accessing a plethora of exciting DeFi projects. The lower transaction fees on BSC are a huge plus. Can’t wait to dive into this new world of opportunities!
Adding BSC to Metamask is crucial for accessing the wide range of DeFi projects and DApps on the Binance Smart Chain. It’s a user-friendly process that enhances your crypto experience and opens doors to exciting opportunities in the BSC ecosystem. Definitely worth the few simple steps it takes!
Adding BSC to Metamask was so easy! I followed the steps outlined in this article, and now I can seamlessly switch between Ethereum and BSC. The lower transaction fees on BSC are definitely a game-changer for me. Excited to explore all the DeFi projects on BSC!
Adding BSC to Metamask is a game-changer! I love how seamlessly I can now connect to the BSC network and explore all the exciting DeFi projects and DApps. The lower transaction fees compared to Ethereum are a huge plus as well. Can’t wait to dive deeper into the BSC ecosystem!
Adding BSC to Metamask is crucial for expanding your DeFi horizons. The integration of BSC into Metamask simplifies interactions with DApps and tokens on the Binance Smart Chain, providing a seamless cross-chain experience for users. It’s a game-changer for those wanting to diversify their crypto portfolio and explore the expanding world of DeFi.
Adding BSC to Metamask was so easy to do! I love how seamless the process was, and now I can access all the exciting DeFi projects on BSC. Can’t wait to explore more!
Adding BSC to Metamask is essential for anyone interested in exploring the world of decentralized finance on the Binance Smart Chain. By seamlessly connecting your wallet to BSC, you can take advantage of lower fees and access a wide range of innovative projects. This guide makes the process simple and accessible for all crypto enthusiasts.
Adding BSC to Metamask is crucial for anyone wanting to fully leverage the decentralized finance opportunities on the Binance Smart Chain. With lower transaction fees and a myriad of innovative projects, integrating BSC into your MetaMask wallet is a game-changer for crypto enthusiasts. Follow the simple steps outlined to seamlessly bridge the gap between Ethereum and BSC, and dive into the world of BSC-based DeFi and DApps!
Adding BSC to Metamask was such a breeze! I followed the step-by-step guide, and now I can seamlessly switch between Ethereum and BSC. The lower transaction fees and diverse range of projects on BSC make it a game-changer!
Adding BSC to Metamask is truly a game-changer! I’ve been able to seamlessly navigate between Ethereum and BSC, enjoying lower fees and discovering amazing DeFi projects. The process described here is clear and easy to follow, making it accessible for beginners as well. Excited to explore the endless opportunities on the BSC network!
Adding BSC to Metamask is essential for anyone wanting to fully experience the world of decentralized finance and explore the vast array of opportunities available on the Binance Smart Chain. The step-by-step guide provided here makes the process simple and accessible for all users.
Adding BSC to Metamask is crucial for anyone wanting to tap into the growing world of DeFi on Binance Smart Chain. I’ve personally found it to be a smooth process, and the ability to easily switch between Ethereum and BSC is a game-changer for my investment strategy.
How do I ensure that adding BSC to Metamask is secure? Are there any precautions I should take?
To ensure the security of adding BSC to Metamask, there are a few precautions you can take. Firstly, make sure you are using the official MetaMask website or extension to avoid phishing scams. Secondly, double-check the details of the BSC network you are adding to ensure they are correct and not manipulated. Additionally, consider storing your recovery seed phrase in a secure location and enable two-factor authentication for an extra layer of security. By following these steps, you can safely add BSC to your MetaMask and protect your assets in the decentralized ecosystem.
Adding BSC to Metamask is a game-changer! With BSC integrated, crypto enthusiasts like myself can navigate the DeFi landscape seamlessly. The process outlined is clear and easy to follow, making it accessible for anyone interested in exploring the world of decentralized finance on Binance Smart Chain. Exciting times ahead!
How can I ensure that I’m inputting the correct details for the BSC network when adding it to MetaMask? I want to make sure I do it accurately.
To ensure that you’re inputting the correct details for the BSC network when adding it to MetaMask, double-check the information you enter in the network settings. Make sure to verify the RPC URL, chain ID, symbol, and block explorer URL against the official sources provided by Binance Smart Chain. This will help ensure that you add the BSC network accurately and securely to your MetaMask wallet.
Adding BSC to Metamask is crucial for anyone seeking to broaden their crypto horizons. The step-by-step guide provides a clear path for seamlessly integrating the Binance Smart Chain network into your MetaMask wallet. By expanding your access to DeFi and DApps on BSC, you can explore innovative projects and take advantage of lower transaction fees. It’s a simple yet powerful way to diversify your crypto portfolio and tap into the dynamic BSC ecosystem.
Adding BSC to Metamask is essential for anyone wanting to fully engage with the diverse world of decentralized finance on the Binance Smart Chain. The ease of transferring assets between Ethereum and BSC, along with the lower fees, makes it a game-changer for crypto enthusiasts looking to explore new opportunities.
Adding BSC to Metamask is a game-changer for navigating the DeFi landscape. Having easy access to BSC opens up opportunities for seamless asset transfers and discovering innovative projects. Follow the steps provided to dive into the world of decentralized applications on the Binance Smart Chain!
Adding BSC to Metamask is such a game-changer! Being able to seamlessly switch between Ethereum and BSC, explore new projects, and enjoy lower fees has made my crypto experience so much more exciting. Can’t wait to dive deeper into the BSC ecosystem!
Adding BSC to Metamask seems like a great opportunity to broaden my crypto horizons. I appreciate the detailed guide on how to seamlessly connect with the Binance Smart Chain and explore the realm of DeFi and DApps available. Can’t wait to dive into this innovative ecosystem!
How can I ensure that the RPC URL and chain ID I fill in for the BSC network are accurate? Is there a recommended source to double-check these details?
Hi EmilyCryptoEnthusiast, ensuring the accuracy of the RPC URL and chain ID for the BSC network is crucial for a seamless connection. A recommended source to double-check these details is the official Binance Smart Chain documentation. They provide up-to-date information to help you verify the correctness of the network settings. Happy exploring the world of BSC-based DeFi and DApps!
Adding BSC to Metamask is crucial for anyone interested in diving into the world of decentralized finance and exploring the exciting realm of DApps on the Binance Smart Chain. The step-by-step guide provided here makes it easy for beginners to seamlessly connect their MetaMask wallet to the BSC network and start leveraging the benefits it offers. Thanks for simplifying this process!
Adding BSC to Metamask was a breeze following this step-by-step guide! I’m excited to delve into the world of BSC-based DeFi and DApps. The ability to seamlessly move assets between Ethereum and BSC is a game-changer for me. Looking forward to exploring all the innovative projects on BSC!
Adding BSC to Metamask is essential for anyone wanting to tap into the vast world of DeFi and DApps on the Binance Smart Chain. The process is simple and straightforward, giving users access to a range of innovative projects and lower transaction fees. Excited to dive into the BSC ecosystem!
Adding BSC to Metamask is crucial for anyone interested in exploring the world of decentralized finance on Binance Smart Chain. The step-by-step guide provided here makes the process simple and accessible, allowing users to seamlessly transition between Ethereum and BSC to take advantage of all the innovative projects and lower transaction fees available.
Adding BSC to Metamask is crucial for anyone wanting to fully dive into the world of decentralized finance on the Binance Smart Chain. The seamless integration allows for easy asset transfers and access to a plethora of innovative projects. It’s definitely a game-changer!
How do I ensure that the RPC URL and chain ID I enter for the BSC network on Metamask are accurate?
To ensure that the RPC URL and chain ID you enter for the BSC network on Metamask are accurate, it’s important to double-check the information provided by the official Binance Smart Chain documentation. Verify that the RPC URL matches the one specified by BSC and confirm the chain ID to ensure seamless integration with the network. By cross-referencing the details with reliable sources, you can guarantee a smooth connection between your Metamask wallet and the BSC network.
Adding BSC to Metamask is a game-changer! It’s incredible how seamlessly you can now navigate between Ethereum and BSC, along with enjoying the perks of lower fees. The step-by-step guide provided here is a real lifesaver for those looking to dive into the world of DeFi and DApps on BSC. Kudos to the team behind this feature!
I believe integrating BSC with Metamask is a game-changer for crypto users. By seamlessly connecting to the Binance Smart Chain, enthusiasts can unlock a world of DeFi opportunities. The step-by-step guide makes it easy to navigate and explore the innovative projects on BSC. Looking forward to diving into this exciting ecosystem!
Adding BSC to Metamask is a game-changer! The step-by-step guide makes it so easy to connect with the exciting world of DeFi and DApps on the Binance Smart Chain. I can’t wait to explore all the innovative projects and opportunities available. Thanks for the detailed instructions!
Adding BSC to Metamask is a game-changer for DeFi enthusiasts. The seamless process of integrating BSC into Metamask opens up a world of opportunities to explore innovative projects and lower transaction fees. Excited to dive into the BSC ecosystem with this guide!
Could you clarify if adding BSC to Metamask will affect the security of my wallet in any way?
Adding BSC to Metamask does not compromise the security of your wallet. When you add a custom network like BSC, your private keys remain secure within MetaMask and are not exposed. You can confidently explore the BSC ecosystem and its opportunities without any risk to your wallet’s security.
Adding BSC to Metamask is a game-changer! It’s so empowering to seamlessly navigate between Ethereum and BSC, unlocking a plethora of DeFi projects and DApps. The lower transaction fees on BSC are a breath of fresh air for crypto enthusiasts!
Adding BSC to Metamask is a game-changer! Being able to seamlessly switch between Ethereum and BSC, explore DApps, and benefit from lower fees enhances the crypto experience for users. Excited to dive into the world of BSC-based DeFi and see what innovative projects await!
Adding BSC to Metamask is such a game-changer! Being able to seamlessly move assets between Ethereum and BSC with lower fees opens up endless opportunities for exploring DeFi and DApps on the Binance Smart Chain.
Adding BSC to Metamask was so easy following these steps! I love how it expands the possibilities for accessing DeFi and DApps on BSC. Can’t wait to explore more projects on the Binance Smart Chain!
Adding BSC to Metamask is essential for anyone interested in exploring the vast opportunities within the Binance Smart Chain ecosystem. The step-by-step guide outlined in the article makes it easy to seamlessly connect with DeFi projects and DApps on BSC. Thanks for the clear instructions!
Adding BSC to Metamask was so easy following this guide! I love how seamlessly I can now navigate between Ethereum and BSC networks. Excited to explore the DeFi projects and DApps on BSC!
How secure is it to add the Binance Smart Chain network to MetaMask for accessing DApps and tokens? Are there any risks involved in this process?
Hey JessicaCrypto, adding the Binance Smart Chain network to MetaMask is generally safe if you input the correct network details. Ensure you’re obtaining the information from reliable sources to mitigate any risks. By connecting to BSC, you open doors to various DeFi opportunities without compromising security.
Adding BSC to Metamask is crucial for anyone wanting to tap into the growing world of DeFi and DApps on the Binance Smart Chain. It’s amazing how easy it is to bridge assets between Ethereum and BSC, not to mention the lower transaction fees and the diverse projects waiting to be discovered!
Adding BSC to Metamask is a game-changer! I love how easily I can now access DeFi projects on the Binance Smart Chain and explore the world of DApps seamlessly. The process described here is clear and simple, making it accessible to all crypto enthusiasts.
Adding BSC to Metamask is crucial for anyone seeking to fully immerse themselves in the world of decentralized finance on the Binance Smart Chain. The seamless integration between Metamask and BSC provides endless opportunities for exploring innovative projects and benefiting from lower transaction fees. With just a few simple steps, users can unlock the potential of DeFi and DApps on BSC, making the crypto journey even more rewarding.
Adding BSC to Metamask is a game-changer! I’ve been able to seamlessly navigate between Ethereum and BSC, enjoying lower transaction fees and discovering exciting projects. The step-by-step guide made the process easy and accessible for anyone interested in exploring the world of DeFi and DApps on BSC.
This guide is super helpful! Could you clarify if there are any specific risks to consider when using BSC with Metamask?
Glad you found the guide helpful, Laura! While using BSC with Metamask offers many advantages, you should be aware of certain risks. Be cautious of smart contract vulnerabilities, as some projects on BSC may not undergo thorough audits. Additionally, always double-check token contracts to avoid scams. Happy exploring!
I just added BSC to my MetaMask, and it has been a game changer! The lower fees are fantastic, and I love having access to all those DeFi projects. The step-by-step guide made it super easy to set up. I can’t wait to explore more DApps on the Binance Smart Chain!
I just added BSC to my MetaMask, and I can’t believe how easy it was! The process in this guide is super clear and straightforward. I’m really excited to explore the DeFi projects on BSC. The lower transaction fees are definitely a game changer. Highly recommend giving it a try!
Great guide! I’m wondering, can you explain how I can safely transfer my assets between Ethereum and BSC once I’ve added the network to Metamask?
Thanks for your question, JessicaTrader92! Once you’ve added the BSC network to your MetaMask, you can safely transfer your assets by using a cross-chain bridge. Make sure to choose a reputable bridge like Binance Bridge or Anyswap. Just connect your wallet, select the asset you want to transfer, and follow the prompts to complete the transaction. Always double-check the addresses and fees before finalizing the transfer. Happy trading!
I just added BSC to my MetaMask wallet, and it was so easy! The guide made the process straightforward, which is a huge relief for someone who’s not super tech-savvy. I can’t wait to start exploring the DeFi opportunities on the Binance Smart Chain. Lower fees and more options? Yes, please!
Glad to hear that, Jessica! Adding BSC can definitely open up a lot of opportunities. I had a similar experience when I set it up; the guide really simplifies everything. I’ve already started diving into some DeFi projects, and the lower fees have been a game changer. Enjoy exploring!
I found this guide super helpful! Adding BSC to my MetaMask wallet was much easier than I expected. Now I can explore various DeFi projects without worrying about high gas fees. Thanks for the clear instructions!
Great guide! Can you clarify what the RPC URL for BSC should be when adding it to MetaMask?
Thanks, JessicaC77! The RPC URL for Binance Smart Chain is https://bsc-dataseed.binance.org/. This should work perfectly for adding BSC to MetaMask. Let me know if you have any more questions!
I just added BSC to my MetaMask, and it was super easy! The guide really helped simplify the process. I’m excited to dive into the DeFi projects available on Binance Smart Chain. The lower transaction fees are a huge plus. Highly recommend giving it a try!
I just added BSC to my MetaMask wallet, and it has been such a smooth experience! The lower transaction fees are a game-changer for me, especially when interacting with various DeFi projects. The step-by-step guide made it easy to follow along and get everything set up. Can’t wait to dive deeper into the BSC ecosystem!
Thanks for the guide! Quick question: do the transaction fees on BSC remain consistently lower than those on Ethereum, or do they fluctuate based on network congestion?
Great question, EmilyCrypto! In general, the transaction fees on BSC are usually lower than those on Ethereum, but they can fluctuate based on network congestion. Most of the time, you’ll find BSC fees to be more stable, which is part of what makes it so appealing for users looking to save on costs while trading or using DApps.
Thanks for the guide! I’m curious, do you know if there are any specific DApps on BSC that are beginner-friendly and worth checking out?
Hey JessicaH92! Absolutely, there are several beginner-friendly DApps on BSC. I’d recommend checking out PancakeSwap for trading and yield farming, as it’s quite intuitive. Another great choice is BakerySwap, which offers a simple interface and fun features. These platforms are perfect for dipping your toes into DeFi! Happy exploring!
I just added BSC to my MetaMask wallet following this guide, and it was so easy! I’m really excited about diving into the DeFi projects on BSC now. The lower fees are definitely a huge plus for me, and I can’t wait to see what new tokens I can explore. Thanks for the helpful steps!
I just added BSC to my MetaMask and it was super easy! The step-by-step guide really helped me understand what to do. I love being able to transfer my assets between Ethereum and BSC without those high fees. Can’t wait to dive into the DeFi projects on BSC!
Thanks for the guide! I was wondering if there’s a specific chain ID I should use for BSC when adding it to MetaMask?
You’re welcome, Sarah! For adding BSC to MetaMask, you’ll want to use the chain ID 56. It’s essential to enter this correctly to ensure a smooth connection with the Binance Smart Chain. Happy exploring!
I recently added BSC to my MetaMask, and I can’t believe how easy the process was! The lower transaction fees are such a game-changer for me, especially when trading frequently. I’m excited to dive into the DeFi projects on BSC and see what new opportunities arise. Highly recommend following this guide if you’re looking to expand your crypto horizons!
I followed the steps to add BSC to my MetaMask, but I’m curious—what are some popular DApps I should check out after connecting?