When it comes to the security of your cryptocurrency, it’s crucial to employ the right measures. One of the most reliable ways to store your digital assets is by utilizing a hardware wallet. A hardware wallet, such as Trezor, offers an extra layer of security by keeping your private keys offline and away from potential hackers and malware.
Trezor is a popular choice among cryptocurrency enthusiasts due to its user-friendly interface and robust security features. To operate Trezor, you simply connect it to your computer or mobile device, enter your PIN, and perform transactions with ease. It is compatible with various cryptocurrencies and can be used with popular wallets like Mycelium, Electrum, and Exodus.
When you utilize Trezor to store your cryptocurrency, your private keys are stored on the device itself, and transaction signing is performed directly on the device. This means that even if your computer or mobile device is compromised, your funds remain secure. Trezor’s firmware is open source, which enables the community to review and contribute to its development, providing an additional layer of transparency and security.
How does Trezor achieve such high levels of security? It employs a combination of features, including a secure PIN, a recovery seed, and multiple layers of encryption. The secure PIN protects your device from unauthorized access, while the recovery seed allows you to restore your wallet if it is lost or stolen. Additionally, Trezor utilizes a BIP39 passphrase encryption and a two-factor authentication process to ensure that only you can access and authorize transactions.
In conclusion, if you want to ensure the safety of your cryptocurrency, it’s essential to employ a hardware wallet like Trezor. Its user-friendly interface, robust security features, and compatibility with popular wallets make it an ideal choice for any cryptocurrency enthusiast. By utilizing Trezor, you can confidently store and transact with your digital assets, knowing that your funds are protected from potential threats.
What is Trezor?

Trezor is a hardware wallet device that is designed to safely store and protect your cryptocurrency. It is a small and portable device that you connect to your computer or smartphone to employ and operate.
Trezor utilizes advanced security measures to ensure the safety and integrity of your cryptocurrency. By employing a combination of secure hardware and software, Trezor provides a secure environment for you to store and manage your digital assets.
Trezor supports a wide range of cryptocurrencies, including Bitcoin, Ethereum and many others. It enables you to securely store your private keys, which are essential for accessing and managing your cryptocurrency. By utilizing Trezor, you can have peace of mind knowing that your digital assets are protected from hacking and other risks.
Setting up and using Trezor is relatively straightforward. You first need to connect the device to your computer or smartphone. Once connected, you can utilize the Trezor Wallet, a user-friendly interface that allows you to manage your cryptocurrency holdings.
With Trezor, you can perform various operations such as sending and receiving cryptocurrency, checking your balance, and creating backups of your wallet. The device operates with multiple layers of security to ensure that your private keys are never exposed to potential threats.
In conclusion, Trezor is a hardware wallet that offers a secure and convenient way to store and manage your cryptocurrency. By employing advanced security measures and providing a user-friendly interface, Trezor ensures the safety and accessibility of your digital assets.
Why should you use Trezor?
Trezor is a hardware wallet that offers advanced security features to ensure the safe storage and management of your cryptocurrency.
1. Hardware Security
Trezor operates as a standalone hardware device, which means it is not connected to the internet when you are not using it. This significantly reduces the risk of hacking and unauthorized access to your funds.
2. User-Friendly Interface
Trezor provides a simple and intuitive interface, making it easy for anyone to employ and operate, regardless of their technical knowledge or experience with cryptocurrency.
3. Multicurrency Support
Trezor supports a wide range of cryptocurrencies, including Bitcoin, Ethereum, and many others. This allows you to utilize and securely store multiple cryptocurrencies in one device.
4. Recovery Options
Trezor provides a secure recovery option in case your device gets lost or damaged. This feature ensures that you can always restore access to your funds, even if something happens to your Trezor wallet.
5. Two-Factor Authentication
Trezor offers an additional layer of security with its two-factor authentication (2FA) feature. You can use this feature to further protect your wallet and prevent unauthorized access to your funds.
6. Peace of Mind
By using Trezor, you can have peace of mind knowing that your cryptocurrency is stored in a highly secure hardware wallet. This eliminates the risk of online attacks and phishing attempts commonly associated with online wallets.
Overall, Trezor is an excellent choice for anyone who wants to ensure the utmost security for their cryptocurrency holdings. Its hardware security, user-friendly interface, multi-currency support, recovery options, two-factor authentication, and peace of mind make it the ideal choice for storing and managing your digital assets.
How to Employ Trezor
When it comes to securely storing and managing your cryptocurrency, one of the best options available is to employ Trezor. Trezor is a hardware wallet that allows you to safely store and utilize your cryptocurrencies, providing an extra layer of security.
Here are some steps on how to operate and employ Trezor:
1. Set up your Trezor device
- Connect your Trezor device to your computer using the USB cable provided.
- Follow the instructions on the Trezor website to set up your device and create a new wallet.
- Make sure to securely backup your recovery seed and keep it in a safe place.
2. Use Trezor with supported cryptocurrencies
Trezor supports a wide range of cryptocurrencies, including Bitcoin, Ethereum, Litecoin, and many others. To employ Trezor with your desired cryptocurrency, you need to:
- Download and install the relevant cryptocurrency wallet software or extension that is compatible with Trezor.
- Connect your Trezor device to your computer.
- Open the cryptocurrency wallet software or extension and follow the instructions to set up your wallet using Trezor.
3. Employ the security features
Trezor offers various security features to ensure the safety of your cryptocurrency:
- Two-factor authentication (2FA): Enable 2FA on your Trezor device to add an extra layer of security.
- Passphrase: You can set up a passphrase to protect your wallet even if someone gains access to your recovery seed.
4. Keep your Trezor firmware up to date

To further enhance the security of your Trezor device, it is essential to keep the firmware up to date. Trezor regularly releases firmware updates that address security vulnerabilities and add new features. Check the Trezor website or the Trezor wallet software for firmware updates and follow the instructions to update your device.
By employing Trezor, you can ensure the safe storage and utilization of your cryptocurrency. Remember to always employ strong security practices, such as keeping your recovery seed securely and using strong passwords, to maximize the security of your Trezor wallet.
Setting up your Trezor device
Before you can start using your Trezor hardware wallet to store and utilize your cryptocurrency securely, you need to set it up properly. The setup process is straightforward and can be completed in just a few steps.
Step 1: Unboxing your Trezor
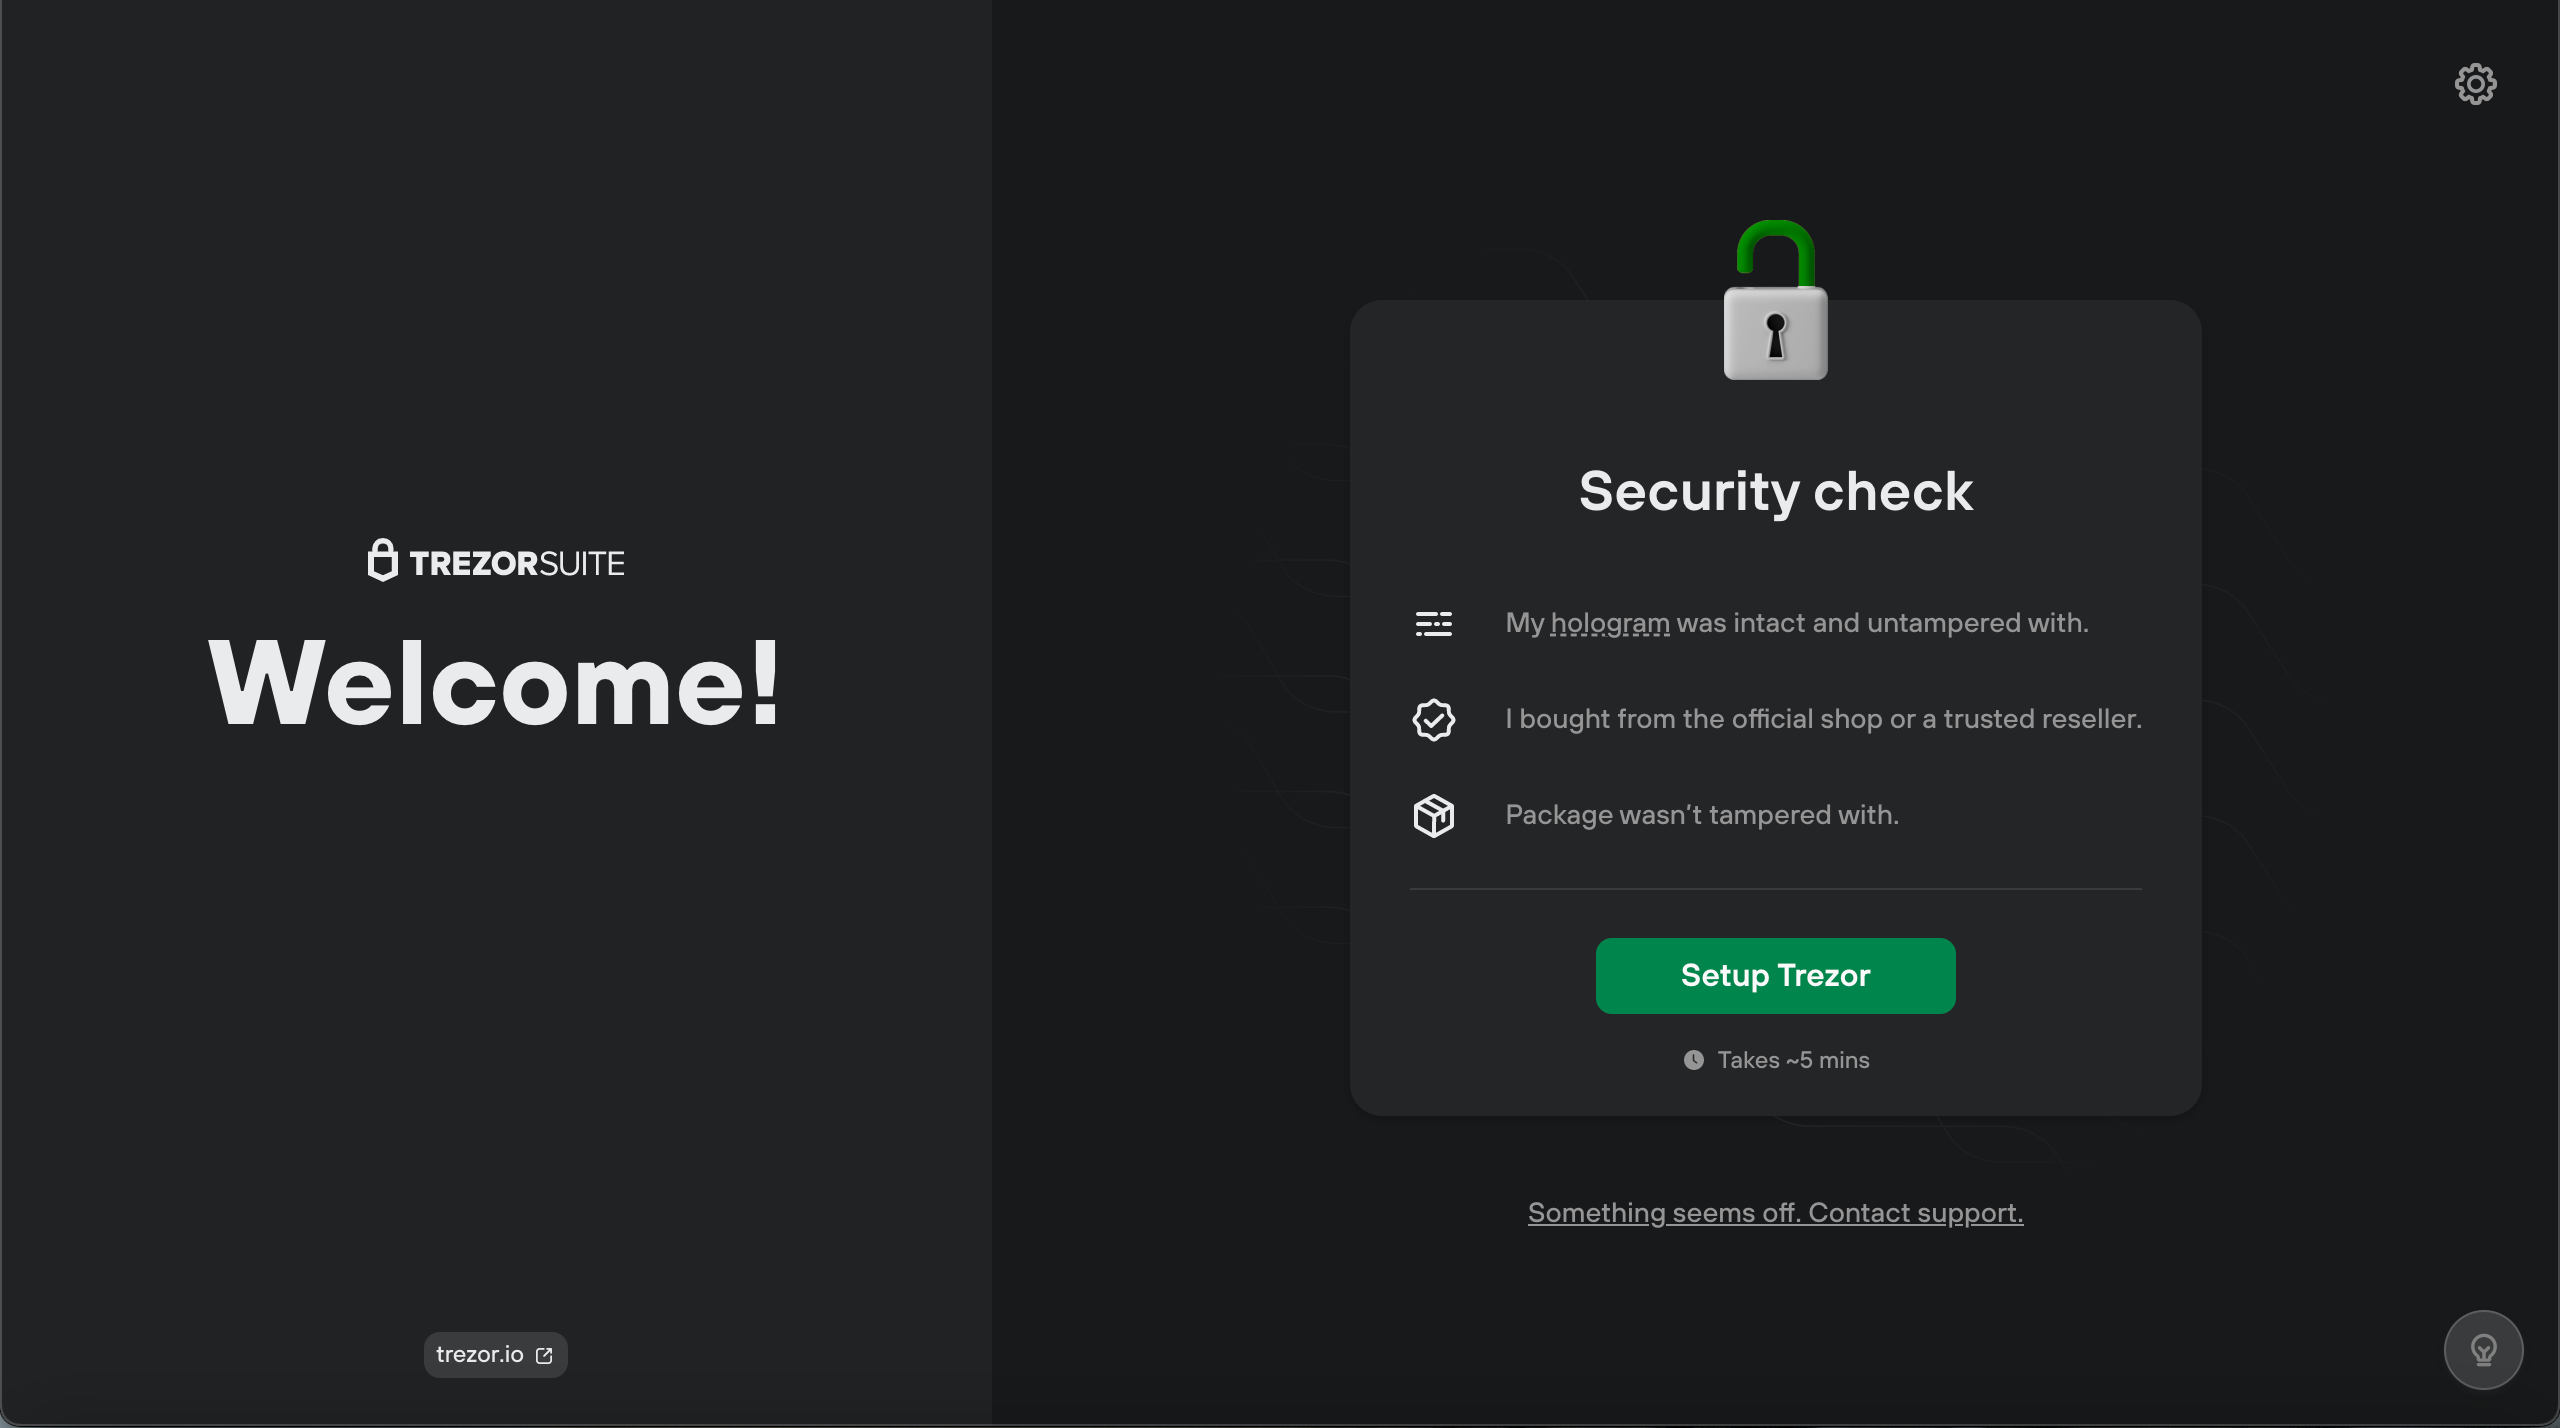
When you receive your Trezor device, make sure to check the packaging for any signs of tampering. You should only use a brand-new, sealed Trezor device to ensure its security.
Step 2: Connecting your Trezor
To operate your Trezor device, you will need to connect it to your computer or mobile device. Use the USB cable provided in the package to connect your Trezor to your device’s USB port.
Step 3: Installing Trezor Bridge
In order to utilize the full functionality of your Trezor hardware wallet, you need to install the Trezor Bridge software. This software enables communication between your Trezor device and your computer or mobile device.
To install Trezor Bridge, visit the official Trezor website and download the appropriate version for your operating system. Follow the provided instructions to complete the installation process.
Step 4: Setting up your Trezor wallet
Once Trezor Bridge is successfully installed, open your browser and navigate to the Trezor wallet website. Follow the instructions to create a new wallet and set a strong, unique password.
Step 5: Employing the recovery seed
During the wallet setup process, you will be prompted to write down a recovery seed. This seed is a string of words that can be used to recover your cryptocurrency in case your Trezor device is lost, stolen, or damaged.
Make sure to store this recovery seed in a secure place, preferably offline. Do not save it on your computer or any online platform, as this could compromise the security of your cryptocurrency.
Note: It is crucial to keep your recovery seed safe and never share it with anyone.
Step 6: Verifying your Trezor device
Before you start using your Trezor device, it is essential to verify its authenticity. You can do this by checking the holographic seal on the device and comparing it with the image provided on the official Trezor website.
If the holographic seal matches the image, you can be confident that your Trezor device is genuine and has not been tampered with.
Tip: Regularly check for firmware updates on the Trezor website and install them to keep your device up to date with the latest security features.
Congratulations! You have successfully set up your Trezor device and are now ready to securely store and operate your cryptocurrency. Remember to always utilize your Trezor hardware wallet for maximum security.
Creating a secure wallet
When it comes to storing your cryptocurrency securely, it is important to utilize a wallet that offers high levels of security. One popular option is the Trezor hardware wallet. This wallet employs multiple layers of security to ensure the safety of your cryptocurrency.
Why Trezor?
Trezor is a hardware wallet that allows you to securely store, utilize, and operate your cryptocurrency. It is designed with high-security standards to protect your digital assets from potential threats.
How to employ Trezor
Using the Trezor wallet is relatively simple. Here are the steps to employ it:
- Connect your Trezor device to your computer using the provided USB cable.
- Visit the Trezor website and download the appropriate software for your operating system.
- Install the software and follow the instructions to set up your Trezor wallet.
- Create a unique PIN for your device and remember it.
- Write down your recovery seed words that will help you restore your wallet in case of loss.
- Once your wallet is set up, you can start transferring your cryptocurrency to your Trezor wallet.
- To operate your Trezor wallet, connect it to your computer and enter your PIN when prompted.
- You can now use your Trezor wallet to securely send, receive, and store your cryptocurrency.
Security features
Trezor utilizes various security features to protect your funds:
- Multi-factor authentication: The Trezor wallet requires you to enter your PIN each time you want to access your funds.
- Offline storage: Your private keys are stored offline on your Trezor device, minimizing the risk of online threats.
- Encryption: All communication between your Trezor device and the wallet software is encrypted, ensuring the confidentiality of your data.
- Backup and recovery: You can create a backup of your wallet using the recovery seed words, allowing you to restore your funds if your device is lost or damaged.
By employing Trezor and following these steps, you can securely store your cryptocurrency and have peace of mind knowing that your digital assets are protected.
Generating and Storing Recovery Seed
When it comes to cryptocurrency, it is crucial to operate secure storage solutions to protect your valuable digital assets. One such solution is to utilize a Trezor hardware wallet, a device specifically designed to securely operate and store your cryptocurrency.
In order to use a Trezor wallet, it is important to generate and store a recovery seed. This recovery seed is a list of words that serves as a backup to your wallet. In case your Trezor device is lost, stolen, or damaged, this recovery seed can be employed to restore your cryptocurrency holdings.
To generate the recovery seed, follow these steps:
- Set up your Trezor device by connecting it to your computer and following the on-screen instructions.
- Once the device is set up, navigate to the wallet interface on your computer.
- Click on the “Create a new wallet” option and confirm your action on the device’s screen.
- The device will then display a series of words. Carefully write down these words in the exact order shown. Make sure to store them in a safe and secure location, as anyone with access to your recovery seed can potentially gain control over your cryptocurrency.
- After writing down all the words, the device will prompt you to confirm the recovery seed by entering some of the words in a specific order. This is a security measure to ensure that you have correctly noted down the recovery seed.
Once you have generated and stored your recovery seed, you can rest assured that your cryptocurrency is securely backed up. Remember to keep the recovery seed in a separate physical location from your Trezor device to minimize the risk of losing both at the same time.
Security Best Practices:
- Store your recovery seed in a fireproof and waterproof container to protect it from physical damage.
- Consider creating multiple copies of the recovery seed and storing them in different secure locations.
- Avoid storing your recovery seed digitally, as it may be vulnerable to hacking or data breaches.
- Regularly check the storage conditions of your recovery seed to ensure its integrity and longevity.
By following these steps and utilizing a Trezor hardware wallet, you can confidently secure and store your cryptocurrency holdings.
How to Operate Trezor
Introduction
If you own cryptocurrency, it is crucial to store it securely. One popular hardware wallet that you can utilize is Trezor. In this guide, we will explore how to operate Trezor and effectively store your cryptocurrency.
Connecting and Setting Up
First, you need to connect your Trezor device to your computer using a USB cable. Once connected, visit the official Trezor website and download the Trezor Bridge software. Install the software on your computer and follow the instructions to set up your device.
Creating a New Wallet
To create a new wallet on your Trezor device, open the Trezor Wallet website. Click on “Create new wallet” and follow the on-screen instructions. Make sure to choose a strong and unique passphrase during the setup process.
Managing Your Wallet
Once your wallet is set up, you can employ Trezor to manage your cryptocurrency. Some of the key operations you can perform include:
- Receiving Funds: To receive funds, navigate to the “Receive” tab on the Trezor Wallet website. Copy the generated address and share it with the sender.
- Sending Funds: To send funds, go to the “Send” tab on the Trezor Wallet website. Enter the recipient’s address and the amount you wish to send.
- Checking Balances: You can utilize Trezor to quickly check the balances of your cryptocurrency holdings. Simply navigate to the “Balances” section on the Trezor Wallet website.
- Managing Accounts: Trezor allows you to create multiple accounts within your wallet. This feature can be useful if you want to separate different types of cryptocurrency or have different purposes for each account.
Backing Up Your Wallet
It is essential to backup your Trezor wallet to safeguard your cryptocurrency holdings. Follow the instructions provided on the Trezor Wallet website to create a backup. Make sure to keep your backup in a secure location, such as a safe or a safety deposit box.
Conclusion
Trezor is a reliable hardware wallet that you can employ to store and manage your cryptocurrency securely. By following the steps outlined in this guide, you can effectively operate Trezor and keep your cryptocurrency safe from potential threats.
Accessing your cryptocurrency
To safely store and access your cryptocurrency, you can employ a hardware wallet like Trezor. Trezor is a popular and highly secure hardware wallet that allows you to operate your cryptocurrency wallet while keeping your private keys offline.
When you employ and operate a Trezor hardware wallet, you gain an extra layer of security by using a device that stores your cryptocurrency offline. This means that even if your computer or smartphone gets compromised, your private keys and funds remain secure.
To use and utilize Trezor for accessing your cryptocurrency, follow these steps:
- Connect your Trezor hardware wallet to your computer or smartphone using the provided USB cable.
- Enter your PIN on the Trezor device to unlock it.
- Open the Trezor wallet interface on your computer or smartphone.
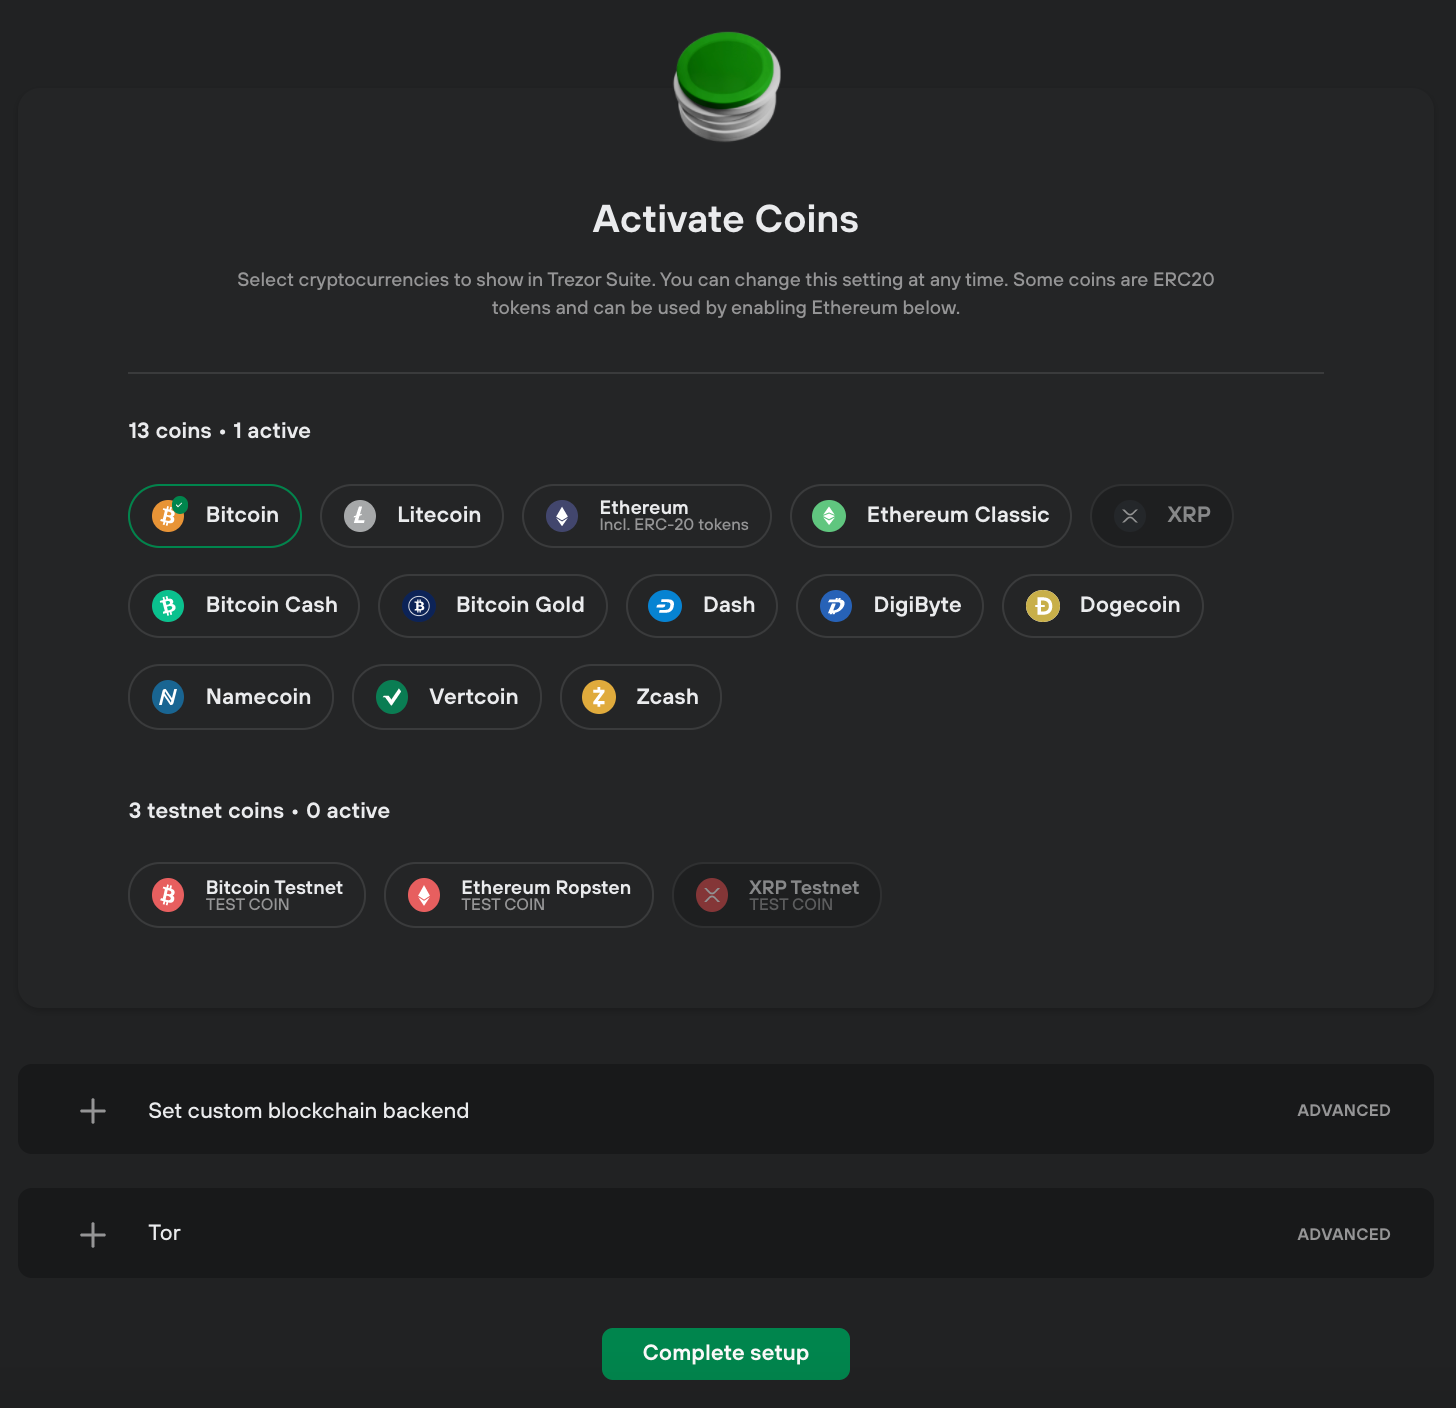
- Follow the instructions on the interface to select the cryptocurrency wallet you want to access. Trezor supports a wide range of cryptocurrencies.
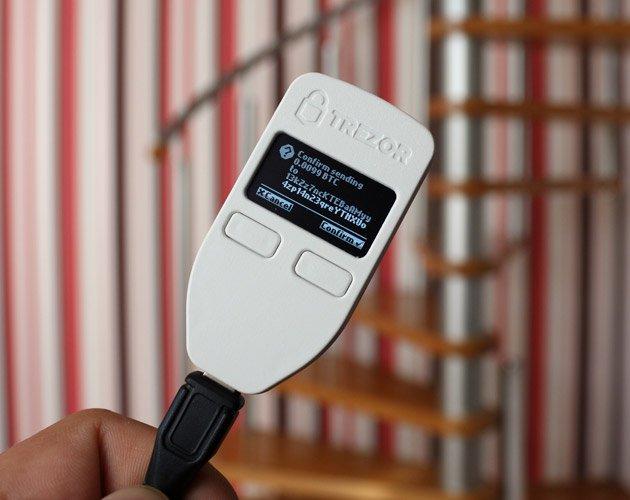
- Confirm the transaction details on your Trezor device’s screen.
- Authorize the transaction by pressing the physical buttons on your Trezor device.
By following these steps, you can securely access your cryptocurrency stored on Trezor. The hardware wallet ensures that your private keys never leave the device, providing you with peace of mind and enhanced security.
Remember to keep your Trezor device and recovery seed (a backup phrase provided during setup) in a safe place. This ensures that even if your Trezor gets lost or damaged, you can recover your cryptocurrency using the recovery seed.
Always prioritize the security of your cryptocurrency holdings and adopt best practices for securing your hardware wallet, such as regularly updating the firmware and double-checking the authenticity of the device.
Managing your transactions
Once you have set up your Trezor wallet, you can start managing your cryptocurrency transactions with ease. Trezor is designed to be user-friendly, making it simple to employ and operate for both beginners and advanced users.
Here is how you can utilize your Trezor wallet to safely manage your transactions:
- Create a new transaction: To initiate a new transaction, access your Trezor interface and select the “Send” option. Enter the recipient’s address, the amount you want to send, and any additional details required.
- Confirm the transaction: Once you have entered the necessary transaction details, Trezor will display a confirmation screen. Verify all the information is correct and carefully review the transaction fee. Confirm the transaction on your Trezor device by pressing the corresponding button.
- Manage multiple accounts: Trezor allows you to employ multiple accounts within your wallet. You can easily switch between accounts to send or receive funds by selecting the desired account from the dropdown menu on the Trezor interface.
- Check transaction history: To view your transaction history, navigate to the “Transactions” tab on the Trezor interface. Here, you can see a list of all your incoming and outgoing transactions, along with the respective dates and amounts.
- Enhance security: Trezor provides an additional layer of security by requiring physical confirmation on the device for each transaction. This ensures that even if your computer or smartphone is compromised, your cryptocurrency remains secure.
By employing a Trezor wallet to store and manage your cryptocurrency, you can safely operate your transactions with peace of mind. Remember to always use secure internet connections and keep your Trezor device protected.
Keeping your Trezor firmware up to date
Operating a Trezor hardware wallet is a safe and secure way to store your cryptocurrency. However, in order to ensure the highest levels of security, it is important to regularly update the firmware of your Trezor device.
Why update the firmware?
Updating the firmware of your Trezor wallet is crucial for several reasons:
- Security: Updating the firmware helps to address any security vulnerabilities that may have been discovered since the last update. By keeping your firmware up to date, you can ensure that your wallet is protected against the latest threats.
- New features: Firmware updates often introduce new features and improvements to the Trezor wallet. Updating the firmware allows you to take advantage of these new functionalities.
- Bug fixes: Like any software, the Trezor firmware can sometimes have bugs. Updating the firmware ensures that any known bugs or issues are resolved, improving the overall performance and stability of your device.
How to update your Trezor firmware
Updating the firmware of your Trezor wallet is a straightforward process. Here’s how you can do it:
- Connect your Trezor: Plug your Trezor device into your computer using the USB cable.
- Visit the Trezor website: Open your web browser and go to the official Trezor website (trezor.io).
- Download the Trezor Bridge: If you haven’t already, download and install the Trezor Bridge software from the website. The Trezor Bridge is a communication tool that allows your computer to connect with your Trezor device.
- Open Trezor Wallet: Once the Trezor Bridge is installed, open the Trezor Wallet by clicking on its icon. Follow the on-screen instructions to set up and unlock your Trezor device.
- Check for firmware update: In the Trezor Wallet, navigate to the “Firmware Updates” section. The wallet will automatically check if there are any firmware updates available for your device.
- Update the firmware: If a firmware update is available, click on the “Update Firmware” button and follow the instructions. Keep your device connected during the update process and make sure not to disconnect it until the update is complete.
By regularly updating the firmware of your Trezor wallet, you can employ the latest security measures, utilize new features, and ensure the best performance for your cryptocurrency storage.
How to Utilize Trezor
Introduction
If you are looking for a secure way to store and manage your cryptocurrency, Trezor is the perfect hardware wallet to utilize. Trezor offers advanced security features and user-friendly interface, making it an ideal choice for cryptocurrency investors and enthusiasts.
What is Trezor?
Trezor is a hardware wallet that allows you to safely store and operate your cryptocurrency. It is a small device that connects to your computer or smartphone via USB, providing an extra layer of security for your digital assets.
How to Use Trezor
- Connect your Trezor device to your computer or smartphone using the provided USB cable.
- Set up your Trezor device by following the on-screen instructions.
- Install the Trezor Bridge software on your computer to enable communication between your device and the Trezor Wallet.
- Access the Trezor Wallet by visiting the official Trezor website and logging in with your credentials.
- Choose the cryptocurrency you want to manage and click on the respective wallet.
- Follow the instructions on the screen to perform transactions, check balances, and manage your cryptocurrency securely.
Advantages of Using Trezor
- Hardware Security: Trezor stores your private keys offline, eliminating the risk of online vulnerabilities.
- User-Friendly Interface: Trezor’s interface is designed with simplicity in mind, making it easy for users of all levels of experience to utilize.
- Versatility: Trezor supports a wide range of cryptocurrencies, allowing you to utilize a single device for multiple digital assets.
- Backup and Recovery: Trezor provides a backup and recovery option in case you lose or damage your device, ensuring the safety of your cryptocurrency.
Conclusion
Utilizing Trezor is an effective way to employ a hardware wallet for enhanced security and control over your cryptocurrency. By following the simple steps to set up and operate your Trezor device, you can utilize its advanced security features and user-friendly interface to safeguard your digital assets with ease.
Using Trezor with different cryptocurrencies
Trezor is a hardware wallet that allows you to securely store and manage your cryptocurrencies. It is compatible with a wide range of cryptocurrencies, giving you the flexibility to utilize different digital assets with ease. Here is how you can employ Trezor to operate and safeguard your favorite cryptocurrencies.
1. Setting up your Trezor wallet
Before you can use Trezor with any cryptocurrency, you need to set up your hardware wallet. Follow these steps:
- Connect your Trezor device to your computer using the USB cable provided.
- Visit the official Trezor website and download the Trezor Bridge software.
- Install the Trezor Bridge software on your computer and follow the instructions to complete the installation.
- Once the installation is complete, open the Trezor Wallet page in your browser.
- Follow the on-screen instructions to initialize your Trezor device and create a new wallet.
2. Using Trezor with a specific cryptocurrency

After setting up your Trezor wallet, you can utilize it with different cryptocurrencies. Here’s how:
| Cryptocurrency | How to use Trezor |
|---|---|
| Bitcoin (BTC) | Open the Trezor Wallet page and select the Bitcoin wallet. Follow the on-screen instructions to operate your BTC wallet securely. |
| Ethereum (ETH) | Install the Trezor Ethereum Wallet or use an external wallet like MyEtherWallet that supports Trezor integration. Connect your Trezor device and follow the instructions to employ your ETH wallet. |
| Litecoin (LTC) | Open the Trezor Wallet page and select the Litecoin wallet. Follow the on-screen instructions to utilize your LTC wallet using your Trezor device. |
| Ripple (XRP) | Install a wallet that supports Trezor integration and XRP storage, such as Exodus or Coinomi. Connect your Trezor device and follow the instructions to operate your XRP wallet securely. |
3. The advantages of using Trezor for cryptocurrency security
When you employ Trezor with different cryptocurrencies, you benefit from the advanced security features provided by this hardware wallet. Some of the advantages include:
- Secure offline storage: Trezor keeps your private keys offline, protecting them from online threats.
- Two-factor authentication: You can enable additional security measures like two-factor authentication to enhance the protection of your cryptocurrency.
- Easy backup and recovery: Trezor allows you to easily backup and recover your wallet, ensuring you don’t lose access to your cryptocurrencies.
- Compatibility with popular wallets: Trezor works seamlessly with popular wallets, allowing you to utilize your cryptocurrencies without any inconvenience.
By utilizing Trezor with different cryptocurrencies, you can rest assured that your digital assets are stored securely and protected from unauthorized access.
Additional security measures
While using the Trezor hardware wallet is already a secure way to store your cryptocurrency, there are additional security measures you can employ to further enhance the protection of your funds.
1. Use a strong and unique password
When setting up your Trezor wallet, make sure to use a strong and unique password. Avoid using common passwords or personal information that can be easily guessed or obtained. A strong password should contain a combination of upper and lowercase letters, numbers, and special characters.
2. Enable two-factor authentication (2FA)
Trezor supports two-factor authentication (2FA), which adds an extra layer of security to your wallet. It requires you to provide a second factor, such as a code generated by a mobile app or received via SMS, in addition to your password. By enabling 2FA, even if someone manages to obtain your password, they still won’t be able to access your funds without the second factor.
3. Keep your firmware up to date
Trezor regularly releases firmware updates to address security vulnerabilities and improve the overall performance of their devices. It’s important to regularly check for and install these updates to ensure that your wallet is protected against the latest threats.
4. Utilize the passphrase feature
Trezor allows you to add an extra layer of security by utilizing the passphrase feature. This feature requires you to enter an additional passphrase along with your password every time you want to access your wallet. By employing a passphrase, even if someone gains access to your device, they won’t be able to access your funds without the correct passphrase.
5. Backup your wallet
It’s crucial to regularly backup your Trezor wallet to ensure that you can recover your funds in case of a lost or stolen device. Trezor provides a recovery seed during the setup process, which you should carefully write down and store in a safe and secure location.
6. Operate on a secure computer
When interacting with your Trezor wallet, make sure to use a secure and trusted computer. Avoid using public computers or networks that may be compromised. Additionally, keep your computer’s operating system and antivirus software up to date to minimize the risk of malware or other security threats.
7. Educate yourself about potential scams
Stay informed about the latest cryptocurrency scams and phishing attempts, as attackers are constantly evolving their techniques. Be cautious of unsolicited emails, messages, or websites requesting your wallet information or recovery seed. Trezor will never ask for your recovery seed or wallet information.
By utilizing these additional security measures, you can further enhance the security of your Trezor hardware wallet and protect your cryptocurrency funds.
Frequently asked questions:
What is a Trezor?
Trezor is a hardware wallet designed to securely store cryptocurrency. It provides a safe and easy way to manage and protect your digital assets.
How does Trezor work?
Trezor works by generating and storing private keys offline, away from potential hackers and malware. It uses a two-factor authentication process to ensure the security of your cryptocurrency.
Can I store all types of cryptocurrencies with Trezor?
Trezor supports a wide range of cryptocurrencies, including Bitcoin, Ethereum, Litecoin, and many more. You can check the official Trezor website for the full list of supported coins.
How can I utilize Trezor for my cryptocurrency transactions?
To utilize Trezor, you need to connect it to your computer or mobile device using a USB cable. Then, you can access your wallet through a compatible software wallet and authorize transactions using the physical buttons on the device. This provides an extra layer of security for your transactions.
Is it easy to operate Trezor?
Yes, Trezor is designed to be user-friendly. It has a simple interface and clear instructions to guide you through the setup and operation process. Even if you are new to cryptocurrency, you should be able to operate Trezor with ease.
Videos:
The Best Ways To Store Small and Medium Amounts of Bitcoin
Can Trezor be used with any type of cryptocurrency?
Yes, Trezor can be used with various cryptocurrencies. It is compatible with a wide range of digital assets, including Bitcoin, Ethereum, Litecoin, and many more. So you can safely store and manage multiple types of cryptocurrencies using your Trezor hardware wallet.
Can Trezor protect against physical theft?
Yes, Trezor can protect against physical theft. As a hardware wallet, Trezor is designed to keep your private keys offline, reducing the risk of theft. It also requires a secure PIN to access your funds, adding an extra layer of protection. In the event that your Trezor device is stolen, the thief would still need to know your PIN to access your cryptocurrencies. So rest assured, your assets are secure with Trezor.
I have been using Trezor for a while now and I can say with confidence that it is the safest way to store my cryptocurrency. The user-friendly interface makes it easy to operate, and the multiple layers of encryption ensure that my private keys are secure. I highly recommend Trezor for anyone looking to keep their digital assets safe.
Trezor is my go-to hardware wallet for storing my cryptocurrencies. Its user-friendly interface and robust security features make it an ideal choice. The fact that it keeps my private keys offline and performs transactions directly on the device gives me peace of mind knowing that my funds are secure. I also appreciate the open-source firmware that allows for community review and contribution. Highly recommend!
Trezor is the best hardware wallet I’ve used so far. It’s so easy to operate and I feel confident knowing that my cryptocurrencies are safe and secure. The open-source firmware is a big plus for me as well. Highly recommend!
Trezor is definitely the best hardware wallet out there. I’ve been using it for a while now and I can say that my cryptocurrency is safe and sound. It’s so easy to store and manage my assets with Trezor, and I love the added layer of security it provides. Highly recommended!
Trezor is a fantastic hardware wallet for storing cryptocurrencies. Its user-friendly interface makes it easy to operate and perform transactions securely. I have been using it for a while now and haven’t faced any security issues. It’s definitely a reliable choice!
This article provides great information on how to safely store cryptocurrency with Trezor. It’s crucial to employ the right measures to ensure the security of our digital assets. Trezor’s user-friendly interface and robust security features make it a popular choice among cryptocurrency enthusiasts. I highly recommend using Trezor to keep private keys offline and protect funds from potential hackers and malware.
I have been using Trezor for a while now and I must say it’s one of the best hardware wallets out there. The user-friendly interface makes it easy for me to manage my cryptocurrencies securely. I highly recommend it!
Trezor is a great hardware wallet option for securely storing and managing your cryptocurrency. I’ve been using it for a while now and I love the peace of mind it offers. The user-friendly interface makes it easy to operate and the open source firmware adds an extra layer of security. Highly recommend!
As a cryptocurrency enthusiast, I can confidently say that Trezor is a game-changer. The user-friendly interface and robust security features make it a top choice for storing and managing digital assets. With Trezor, my private keys are always offline and away from potential hackers. Plus, the open-source firmware provides an extra layer of transparency. Highly recommend!
I’ve been using Trezor for a while now, and I must say it’s been a game-changer for me. The user-friendly interface and robust security features make it an ideal choice for storing my cryptocurrency. With Trezor, I no longer have to worry about potential hackers or malware. Highly recommend it!
I’ve been using Trezor for a few months now and I must say, it’s been a game changer for me in terms of security. Storing my cryptocurrency in a hardware wallet like Trezor gives me peace of mind knowing that my private keys are kept offline and away from potential threats. Plus, the user-friendly interface makes it a breeze to operate. Highly recommend!
Trezor is the best hardware wallet for storing cryptocurrencies. I have been using it for a while now and I feel completely secure knowing that my private keys are kept offline. The user-friendly interface makes it easy to operate, and the open-source firmware adds an extra layer of transparency and security. Highly recommended!
Wow, Trezor is a game-changer! I feel so much more secure knowing that my private keys are kept offline. Plus, the open-source firmware gives me peace of mind. Thanks for the informative article!
I’m new to cryptocurrency and hardware wallets. Can you explain how the Trezor hardware wallet securely stores and manages my cryptocurrencies?
Hi BitcoinBoy63, I’d be happy to explain how the Trezor hardware wallet works! The Trezor wallet securely stores and manages your cryptocurrencies by keeping your private keys offline and away from potential hackers and malware. Your private keys are stored on the device itself, so even if your computer or mobile device is compromised, your funds remain safe. Trezor also uses a secure PIN, a recovery seed, and multiple layers of encryption to ensure the highest levels of security. It’s a user-friendly and reliable choice for storing your cryptocurrency. Let me know if you have any more questions!
Can I connect my Trezor to multiple devices at once?
No, you cannot connect your Trezor to multiple devices at once. Trezor is designed to be connected to one device at a time to ensure the highest level of security for your cryptocurrency. This limitation prevents any potential vulnerabilities that could arise from multiple device connections. It’s recommended to keep your Trezor connected to a trusted device and avoid connecting it to public or unsecure networks.
As an avid cryptocurrency enthusiast, I highly recommend using Trezor to safely store your digital assets. Its user-friendly interface makes it easy to operate, and the robust security features keep my private keys secure from potential hackers and malware. With Trezor, I can trust that my funds remain safe even if my computer or mobile device is compromised. It’s definitely a reliable choice in the cryptocurrency world.
Trezor is the best hardware wallet out there! I’ve been using it for years and my cryptocurrencies have never been safer. It’s so easy to use and the security features are top-notch. I highly recommend it.
I’ve been using Trezor for a while now and I can confidently say it’s the best hardware wallet out there. The user-friendly interface makes it easy to operate and the security features are top-notch. Storing my cryptocurrency has never been safer!
Is Trezor compatible with all types of cryptocurrencies? Can I store any digital assets on it?
Yes, Trezor is compatible with various cryptocurrencies and can be used to store a wide range of digital assets. It supports popular cryptocurrencies like Bitcoin, Ethereum, and Litecoin, as well as many others. So you can store your favorite digital assets on Trezor with peace of mind!
I have been using Trezor for a while now and I must say it’s the best hardware wallet I’ve used so far. The user-friendly interface and robust security features are top-notch. Plus, knowing that my private keys are stored offline gives me peace of mind. Highly recommend!
I’ve been using Trezor for a while now and it’s been a game-changer for my cryptocurrency security. With Trezor, I can safely store my private keys offline and away from potential hackers. The user-friendly interface makes it easy for me to manage my cryptocurrencies. I highly recommend it!
I’ve been using Trezor for a while now and it’s by far the safest way to store my cryptocurrencies. With the offline private key storage and secure transaction signing, I don’t have to worry about my funds being compromised. Plus, the user-friendly interface makes it a breeze to operate. Highly recommend it!
It’s amazing how Trezor ensures the security of my cryptocurrency. With its user-friendly interface and robust security features, I feel confident in storing my digital assets. The open-source firmware and multiple layers of encryption provide an additional layer of transparency and security. I highly recommend utilizing Trezor for a safe crypto storage.
Can I use Trezor with any type of cryptocurrency or only specific ones?
Hi Jennifer007! With Trezor, you can safely store and manage a variety of cryptocurrencies, not just specific ones. It is compatible with popular cryptocurrencies like Bitcoin, Ethereum, Litecoin, and many more. So you can easily utilize Trezor to secure your cryptocurrency, regardless of the type. Hope this helps!
This is a must-read article for anyone who wants to keep their cryptocurrency safe. Trezor is by far the best hardware wallet out there. I’ve been using it for years and never had any security issues. Plus, it’s so easy to use!
I have been using Trezor for over a year now and I can confidently say that it is the best hardware wallet out there. The user-friendly interface makes it easy for anyone to use, and the extra layer of security provided by keeping the private keys offline is invaluable. I also appreciate that Trezor is compatible with multiple cryptocurrencies and wallets. Overall, I highly recommend Trezor for securely storing and managing your cryptocurrencies.
Is Trezor compatible with all types of cryptocurrencies?
Yes, Trezor is compatible with various cryptocurrencies. It supports a wide range of cryptocurrencies and can be used with popular wallets like Mycelium, Electrum, and Exodus. So you can securely store and manage different types of cryptocurrencies with Trezor.
Trezor is definitely the best hardware wallet out there. Its user-friendly interface and robust security features make it the perfect choice for safely storing and managing your cryptocurrencies. I’ve been using Trezor for a while now and I couldn’t be happier with its performance. Highly recommended!
I have been using Trezor for a while now and I must say, it’s the best hardware wallet out there. The user-friendly interface makes it so easy to operate and store my cryptocurrencies securely. With the open-source firmware, I feel confident in the transparency and security of my funds. Trezor is definitely a top choice for crypto enthusiasts like me!
Can Trezor be used with any type of cryptocurrency?
Yes, Alex789! Trezor can be used with various cryptocurrencies. It supports popular coins like Bitcoin, Ethereum, Litecoin, and many others. With Trezor, you can securely store and manage a diverse portfolio of digital assets.
What are the popular wallets that are compatible with Trezor?
Hi JohnSmith3685, when it comes to wallets compatible with Trezor, there are several popular options. Some of them include Mycelium, Electrum, and Exodus. These wallets work seamlessly with Trezor, allowing you to manage and store your cryptocurrency securely. Hope this helps!
Trezor is definitely the best hardware wallet out there! I’ve been using it for years and it has never let me down. The user-friendly interface makes it super easy to operate and I feel confident knowing that my private keys are stored securely offline. Highly recommend!
Trezor is the best hardware wallet out there! I’ve been using it for a while now and my cryptocurrencies feel safe. The user-friendly interface and the extra layer of security provided by keeping the private keys offline are fantastic. Highly recommend!
Trezor is a game-changer! I’ve been using it for a while now and I feel so secure with my cryptocurrency. The user-friendly interface makes it easy to operate and the security features are top-notch. I highly recommend everyone to utilize Trezor for storing their digital assets.
I have been using Trezor for a while now and I must say it’s the safest way to store my cryptocurrency. The user-friendly interface makes it easy to operate and the extra layers of security give me peace of mind. Highly recommended!
How can I be sure that my funds are really secure with Trezor? Are there any known vulnerabilities?
Trezor has been thoroughly tested and has a strong reputation for security. Its offline storage of private keys and transaction signing on the device itself greatly reduces the risk of exposure to hackers. Additionally, Trezor’s open-source firmware allows for constant scrutiny and contributions from the community, making it less likely for any vulnerabilities to go unnoticed. Rest assured, your funds are in safe hands with Trezor.
Is Trezor compatible with all major cryptocurrencies?
Yes, Trezor is compatible with various cryptocurrencies, including Bitcoin, Ethereum, Litecoin, and more. You can securely store a wide range of digital assets on your Trezor hardware wallet for added peace of mind.
Great article! I’ve been using Trezor for a while now and I feel so much safer storing my cryptocurrency. The user-friendly interface and robust security features really make a difference. Thanks for sharing!
How does Trezor ensure that the recovery seed is fully secure and can’t be compromised?
Trezor ensures the security of the recovery seed by generating it offline during the device setup process. This means that the seed is never exposed to any online network, making it highly secure and resistant to compromise. Additionally, the recovery seed is encrypted and can only be accessed by the device itself, adding an extra layer of protection to your cryptocurrency holdings.
As a cryptocurrency enthusiast, I must say that utilizing a hardware wallet like Trezor is essential to safeguard your digital assets. The extra layer of security provided by storing private keys offline gives me peace of mind knowing that my funds are safe from potential hackers and malware attacks.
How does Trezor achieve such high levels of security? Is the open-source firmware really effective in ensuring transparency and security?
Yes, Alice. Trezor’s open-source firmware plays a crucial role in enhancing transparency and security. By allowing the community to review and contribute to its development, any vulnerabilities can be quickly identified and addressed, making it a robust solution for safeguarding your cryptocurrency.
As a cryptocurrency investor, I always prioritize security when it comes to storing my digital assets. Trezor seems like a reliable hardware wallet with robust security features. I appreciate the extra layer of protection provided by keeping private keys offline. It’s essential to utilize such tools to safeguard our investments in the volatile crypto market.
As an experienced cryptocurrency enthusiast, I can attest to the importance of using a hardware wallet like Trezor to securely store and manage your digital assets. The extra layer of security provided by Trezor, with features such as secure PIN and encryption, gives me peace of mind knowing my funds are well protected.
How does Trezor ensure the security of the recovery seed and encryption keys? Can these be compromised in any way?
Trezor ensures the security of the recovery seed and encryption keys through advanced encryption protocols and secure storage mechanisms. These keys are generated and stored securely on the device, making it extremely difficult for them to be compromised. Additionally, the multiple layers of encryption add an extra level of protection, safeguarding your assets even in the unlikely event of a breach.
As a cryptocurrency enthusiast, I believe it’s essential to utilize a hardware wallet like Trezor to securely store and manage digital assets. Trezor’s user-friendly interface and robust security measures make it a reliable choice for protecting private keys and transactions. I appreciate the open-source firmware that adds an extra layer of transparency and security to the device.
When it comes to the security of your cryptocurrency, it’s crucial to employ the right measures. Trezor is indeed a reliable choice for securely storing and managing digital assets. By utilizing a hardware wallet like Trezor, you can ensure that your private keys are kept offline and away from potential threats.
Utilizing a hardware wallet like Trezor is essential to securely store and manage my cryptocurrency. I appreciate the robust security features and user-friendly interface that Trezor offers.
As an experienced cryptocurrency enthusiast, I can confidently say that storing your digital assets with Trezor is a wise decision. Its user-friendly interface and robust security features make it a reliable choice for safeguarding your private keys and transactions. By utilizing Trezor, you can rest assured that your funds are protected even in the face of potential security threats. I highly recommend incorporating Trezor into your cryptocurrency management strategy.
As a cryptocurrency enthusiast, I believe that utilizing a hardware wallet like Trezor is essential for securely storing and managing digital assets. Trezor’s user-friendly interface and robust security features make it a reliable choice in the world of cryptocurrency.
As a cryptocurrency enthusiast, I believe it is essential to utilize a hardware wallet like Trezor for secure storage. The features provided, such as offline storage of private keys and secure transaction signing, offer peace of mind in the volatile world of digital assets.
As a cryptocurrency enthusiast, I strongly believe that utilizing a hardware wallet like Trezor is essential to keeping your digital assets secure. The user-friendly interface and robust security features make Trezor a top choice for storing cryptocurrencies.
How does Trezor ensure the security of the recovery seed and encryption keys?
Trezor ensures the security of the recovery seed and encryption keys through robust encryption methods and secure storage mechanisms. The recovery seed, which is generated when you set up your Trezor device, is crucial for restoring access to your funds in case your device is lost or damaged. This seed is displayed only once during the setup process and should be securely stored offline in a safe place. As for the encryption keys, Trezor uses advanced cryptographic techniques to protect them from unauthorized access. By following best practices for seed and key management, you can enhance the security of your cryptocurrency holdings with Trezor.
Using a hardware wallet like Trezor is essential to securely store and manage your cryptocurrency. When you connect your Trezor to your device and enter your PIN, you can trust that your digital assets are safe from potential threats. It’s important to keep your private keys offline and utilize the extra layer of security that Trezor provides.
Using a hardware wallet like Trezor to securely store and manage your cryptocurrencies is essential in today’s digital age. It’s crucial to employ the right security measures to protect your assets from potential threats. Trezor’s user-friendly interface and robust security features make it a reliable choice for cryptocurrency enthusiasts. By storing your private keys offline and utilizing features like a secure PIN and encryption, Trezor ensures that your funds are safe even in the face of cyber threats.
How does Trezor achieve such high levels of security? Have they ever faced any security breaches?
Yes, Trezor has maintained a strong security record. They have not experienced any major security breaches to date. The combination of features such as secure PIN, recovery seed, and encryption layers help ensure the safety of your cryptocurrency stored with Trezor.
Storing my cryptocurrency securely is my top priority. I appreciate the extra layer of security that Trezor offers with its hardware wallet. Being able to store my private keys offline gives me peace of mind, knowing that my digital assets are safe from potential threats like hackers and malware.
As an experienced cryptocurrency enthusiast, I strongly believe that utilizing a hardware wallet like Trezor is essential for securely storing digital assets. Its robust security features and user-friendly interface make it a top choice for cryptocurrency storage.
As an avid cryptocurrency investor, I highly recommend utilizing a hardware wallet like Trezor for securely storing your digital assets. The user-friendly interface and robust security features make it a reliable choice for safeguarding your private keys and ensuring your funds remain protected, even in the event of a compromised computer or device.
As a cryptocurrency enthusiast, I believe it’s essential to utilize a hardware wallet like Trezor for securely storing and managing digital assets. Trezor’s user-friendly interface and robust security features make it a top choice for ensuring the safety of my investments.
As a cryptocurrency enthusiast, I believe it is crucial to properly utilize hardware wallets like Trezor to securely store digital assets. The robust security features and user-friendly interface make it a reliable choice for safeguarding private keys from potential threats. Employing Trezor for cryptocurrency storage provides peace of mind knowing that funds are protected even in the event of a compromised device.
Utilizing a hardware wallet like Trezor is essential for the security of your cryptocurrency. Storing your private keys offline significantly reduces the risk of theft by hackers. I highly recommend Trezor for its top-notch security features and user-friendly interface.
As a cryptocurrency enthusiast, I believe it’s essential to utilize a hardware wallet like Trezor for securely storing and managing digital assets. The level of security offered by hardware wallets such as Trezor is unparalleled, ensuring that private keys and transactions are kept safe from potential threats.
How does Trezor achieve such high levels of security? Are there any potential vulnerabilities that users should be aware of?
Hey Alice_1985, Trezor ensures high security levels through a combination of features like a secure PIN, a recovery seed, and multiple layers of encryption. While no system is entirely impervious, Trezor’s approach minimizes risks and vulnerabilities significantly. It’s always good to stay vigilant and keep your firmware updated to mitigate any potential threats. Happy securing!
How does Trezor achieve such high levels of security? Are there any additional security measures that users should be aware of?
Yes, Trezor employs a combination of features to ensure high security levels. In addition to the secure PIN and recovery seed, it also utilizes multiple layers of encryption. These measures help safeguard your cryptocurrency assets effectively.
How does Trezor achieve such high levels of security? Will it protect my cryptocurrencies in case of a cyber attack?
Yes, Trezor’s security measures, such as the secure PIN, recovery seed, and encryption layers, are designed to safeguard your cryptocurrencies even in the event of a cyber attack. By keeping your private keys offline and utilizing these advanced security features, Trezor provides a highly secure storage solution for your digital assets.
As a cryptocurrency investor, I always make sure to use my Trezor hardware wallet for storing and managing my digital assets securely. It’s essential to employ these advanced security measures to protect your funds from potential threats. Trezor’s user-friendly interface and robust security features give me peace of mind knowing that my private keys are safe and transactions are secured. I highly recommend utilizing Trezor for anyone serious about safeguarding their cryptocurrency.
When it comes to the security of your cryptocurrency, it’s crucial to employ the right measures. I believe using a hardware wallet like Trezor is the safest way to store and manage your digital assets. Trezor’s user-friendly interface and strong security features make it a top choice for cryptocurrency enthusiasts.
As a cryptocurrency enthusiast, I believe that storing digital assets securely is of utmost importance. Utilizing a hardware wallet like Trezor adds a strong layer of protection by keeping private keys offline, away from potential threats. The user-friendly interface and robust security features of Trezor make it a top choice for safeguarding my investments. I highly recommend using Trezor for secure storage and effortless transactions.
Storing cryptocurrency securely with Trezor is essential in today’s digital age. I appreciate the emphasis on employing advanced security measures like secure PIN, recovery seed, and encryption layers to safeguard my digital assets. Trezor’s user-friendly interface and open-source firmware contribute to building trust and confidence in using this hardware wallet.
Utilizing a hardware wallet like Trezor is essential for securely storing and managing your cryptocurrencies. I appreciate the extra layer of security it provides by keeping private keys offline and away from potential threats. It’s crucial to employ such measures to safeguard our digital assets in today’s online landscape.
Using Trezor to store my cryptocurrency has provided me with peace of mind knowing that my private keys are kept offline and secure, away from any potential threats. It truly simplifies the process of managing my digital assets while ensuring top-notch security.
Using Trezor to store my cryptocurrency has given me peace of mind knowing that my digital assets are safeguarded. The user-friendly interface makes it easy to manage transactions securely, and the open-source firmware adds an extra layer of transparency and trust. I highly recommend Trezor for anyone looking to enhance the security of their investments.
As an avid cryptocurrency investor, I highly recommend utilizing Trezor for securely storing your digital assets. Its robust security features and user-friendly interface make it a top choice for safeguarding your private keys and ensuring the safety of your transactions. With Trezor, you can rest assured that your funds are protected even in the face of potential cyber threats.
How does Trezor ensure the security of the recovery seed against potential breaches or hacks?
Trezor ensures the security of the recovery seed by generating it offline and displaying it on the device screen for you to write down and store in a safe place. This method prevents the seed from being exposed to online threats, making it highly secure against breaches or hacks.
How does Trezor ensure the security of the recovery seed in case it gets compromised?
Trezor ensures the security of the recovery seed by allowing you to set up a passphrase along with your seed. This passphrase acts as an additional layer of security, ensuring that even if someone gains access to your recovery seed, they would still need the passphrase to access your funds. Make sure to keep your passphrase secure and separate from your recovery seed for maximum protection.
As an experienced cryptocurrency trader, I highly recommend utilizing Trezor to securely store your digital assets. Its robust security features and user-friendly interface make it a top choice for safeguarding your private keys and transactions. Make sure to follow best practices in setting up your Trezor, such as creating a strong PIN and securely storing your recovery seed.
Using Trezor to store your cryptocurrency is essential for ensuring the security of your digital assets. I believe that employing a hardware wallet like Trezor, with its robust security features and user-friendly interface, is crucial in protecting your private keys from potential threats such as hackers and malware. Additionally, the open-source firmware of Trezor adds a layer of transparency and community-driven security that sets it apart in the market.
Utilizing Trezor for storing my cryptocurrency has provided me with peace of mind knowing that my private keys are kept offline and secure from potential threats. The user-friendly interface and robust security features make it a top choice for safeguarding digital assets. I highly recommend employing Trezor for ensuring the safety of your investments.
Can you explain how the recovery seed works in more detail? I’m curious about the process of restoring my funds if I lose my Trezor.
Sure, JessicaRy! The recovery seed is essentially a series of words that you receive when you set up your Trezor. It acts as a backup for your wallet. If you ever lose your device, you can restore your funds by entering this seed into another Trezor or compatible wallet. Just make sure to keep it in a safe place, as anyone with access to your recovery seed can control your funds!
I’m curious, how does the recovery seed work in conjunction with the secure PIN for maximum security on my Trezor?
Hi SarahTechie! The recovery seed is essentially a backup of your wallet. It allows you to regain access to your funds in case you forget your secure PIN or if your Trezor gets lost or damaged. When setting up Trezor, you’ll generate a recovery seed made up of 12 to 24 random words. Make sure to write it down and store it in a safe place. For maximum security, always keep your recovery seed offline and never share it with anyone. This way, even if someone were to gain access to your PIN, they wouldn’t be able to access your funds without the recovery seed.
I recently started using Trezor for my cryptocurrency storage, and I can’t emphasize enough how much peace of mind it gives me. The setup was straightforward, and I feel much safer knowing my private keys are offline. Plus, the integration with various wallets makes managing my assets a breeze. Highly recommend for anyone serious about securing their investments!
I recently started using Trezor for my cryptocurrency storage, and I couldn’t be happier! The setup process was straightforward, and I appreciate the extra security it provides. Knowing my private keys are kept offline gives me peace of mind, especially with all the hacking news lately. Highly recommend it for anyone serious about keeping their digital assets safe!
I’ve been using Trezor for a few months now, and I can honestly say it’s a game changer for securing my crypto. The usability is fantastic, and I feel much safer knowing my private keys are offline. The added layers of security are impressive, especially the recovery seed. Highly recommend it to anyone serious about protecting their digital assets!
I love how user-friendly Trezor is! Can you explain more about the recovery seed and how it ensures my funds are safe?
Absolutely, Alice! The recovery seed is essentially a backup of your wallet. It’s a unique set of words that you generate when you set up your Trezor. If you ever lose access to your device, you can restore your funds using this seed. Just make sure to keep it safe and never share it with anyone, as it’s the key to your assets!
I absolutely trust Trezor with my investments! The offline storage feature gives me peace of mind knowing my cryptocurrencies are safe from hackers. Plus, the user-friendly interface makes managing my assets so easy. I recommend it to all my friends!
I’ve been using my Trezor for a few months now, and I can’t recommend it enough! The setup was straightforward, and knowing my private keys are offline gives me peace of mind. It really simplifies managing my cryptocurrencies while keeping them safe from potential online threats. If you’re serious about protecting your digital assets, definitely consider getting a Trezor!
I recently started using Trezor for my crypto storage, and I have to say, I feel a lot safer knowing my private keys are offline. The user interface is super easy to navigate, which makes managing my assets a breeze. I appreciate the open-source firmware as it adds a layer of transparency that’s reassuring. Highly recommend it to anyone serious about keeping their cryptocurrencies secure!
I really appreciate how easy it is to use Trezor for managing my cryptocurrencies. The added layer of security gives me peace of mind. After hearing about so many hacks lately, knowing my private keys are offline makes a huge difference. I definitely recommend it to anyone serious about crypto storage!
I absolutely love using my Trezor for cryptocurrency storage! It gives me peace of mind knowing my private keys are stored offline. The user interface is straightforward, making it easy to operate, even for beginners. Plus, the added layer of security with the PIN and recovery seed is impressive. I highly recommend it to anyone serious about crypto security!
I’ve been using Trezor for a few months now and I can confidently say it’s a game changer for cryptocurrency storage. The ease of use and security it offers is unmatched. Knowing my private keys are offline gives me peace of mind. Highly recommend it to anyone serious about keeping their assets safe!
I absolutely love using my Trezor wallet! It’s super easy to set up and gives me peace of mind knowing my cryptocurrencies are safe. The added security measures really make a difference, especially with all the hacking news lately. I recommend it to everyone who wants to keep their digital assets secure!
I absolutely love using my Trezor! It gives me such peace of mind knowing that my cryptocurrencies are secure. Setting it up was super easy, and I feel confident that my private keys are safe from any online threats. Definitely a must-have for anyone serious about managing their digital assets!
I recently started using Trezor and I couldn’t be happier with my decision! The setup was straightforward, and I feel a lot more secure knowing my private keys are stored offline. It’s definitely a must-have for anyone serious about protecting their cryptocurrency. Also, the fact that it’s open source gives me extra peace of mind. Highly recommend!
I’m really interested in the security features of Trezor. Can you elaborate on how the recovery seed works in protecting my assets?
Absolutely, Jessica! The recovery seed is essentially a backup for your wallet. When you set up your Trezor, it generates a 12 to 24-word phrase that acts as a key to recover your assets if the device is lost or damaged. It’s crucial to store this seed securely, away from digital access, so that only you can retrieve your cryptocurrencies. If someone else gains access to it, they can restore your wallet on their device, which is why keeping it private is so important!
I’ve been considering getting a Trezor wallet for my bitcoin. Can someone explain how the recovery seed works and why it’s so important?
I’ve been using Trezor for several months now, and I can confidently say it’s the best decision I made for my crypto investments. The ease of use combined with its strong security features really sets it apart from other options. I love how my private keys are stored offline, giving me peace of mind. If you care about keeping your assets safe, Trezor is definitely the way to go!
Great article! I’m curious, how does the recovery seed work in practice if I lose my Trezor device? Can I still access my funds?